Quick answers
Know what you want to do? Find it here. The chapters below have the steps and pictures for each one.
| I want to… | Go to |
|---|---|
| Add a camp, hike or week night | Events > Add an event |
| See who's coming and who has paid | Events > RSVPs, then tap the event |
| Record a bank transfer | Who's coming > Payment received, or Money > Payments > Mark as paid |
| Remind families to reply or pay | Who's coming > Send reminder / Send payment reminder |
| Tell families going about lifts or packing | The event's page > Post an update |
| Cancel tonight's meeting | Events > News > Write a post > Urgent |
| Take the roll | The event's Attendance tab > Take attendance |
| Finish the night | Bottom of the roll > Finalise Night |
| Approve a family's News post | Events > News > To check |
| Pack the trailer for camp | The event's page > Start a packing list |
| Give Scouts a kit list | The event's page > Start a kit list |
| Find a piece of gear | Equipment > Equipment list, or scan its QR label |
| Report broken or missing gear | The item's page > Report a problem |
| Move a Cub up to Scouts | Members > Youth > open the child |
| Resend a parent's invite | Members > Families > open the family |
| Sort out patrols | Members > Patrols |
| Bring a guest from another group to an event | Members > Join enquiries > Add a guest, then invite them by name on the event |
| Refund a family | Money > Payments > Refund |
| Book the hall for a meeting | Events > Bookings > Add a booking |
| Set up the hall iPad | Members > Hall iPad |
| Find instructions for anything else | Help & FAQ |
Getting started
Heany Hub is the group's own website for members. Families use My Scouts to reply to events and pay. Leaders use the Heany Hub pages to run everything else. You never need the WordPress dashboard for day-to-day work.
Signing in
- Go to heanyparkscouts.com.au and press the Heany Hub button at the top.
- Sign in the way you set up your account: Google, a passkey, or your email and password.
- You land on My Scouts. Press the Heany Hub button again to get to the leaders' menu.
The Heany Hub page
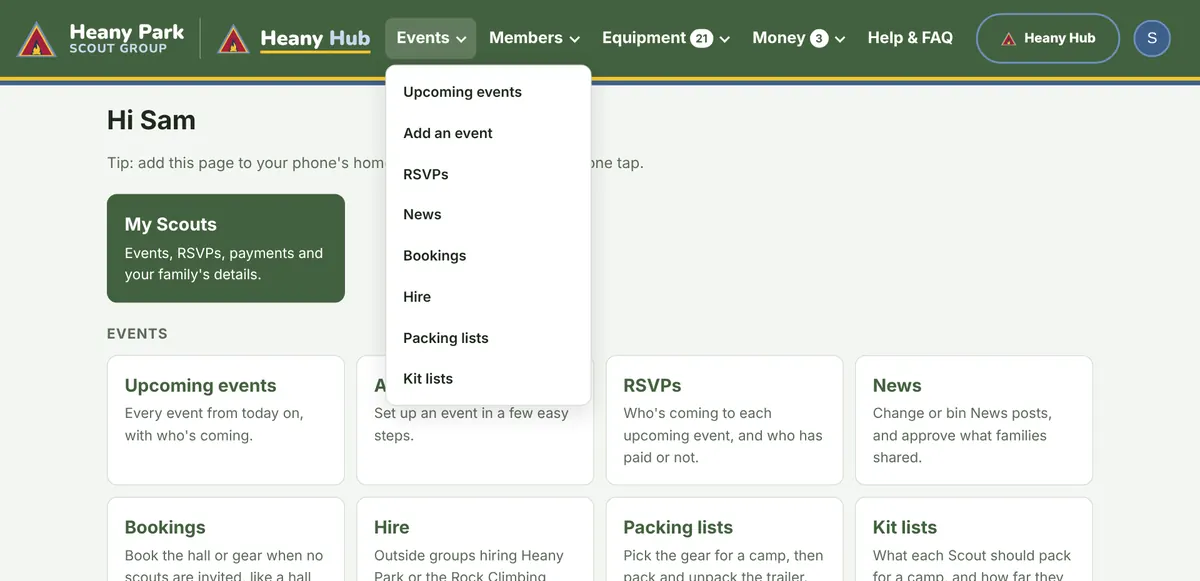
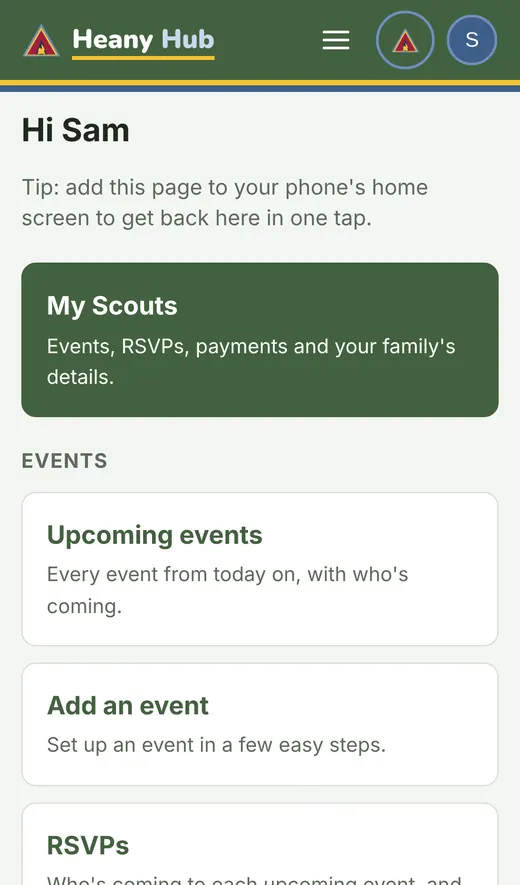
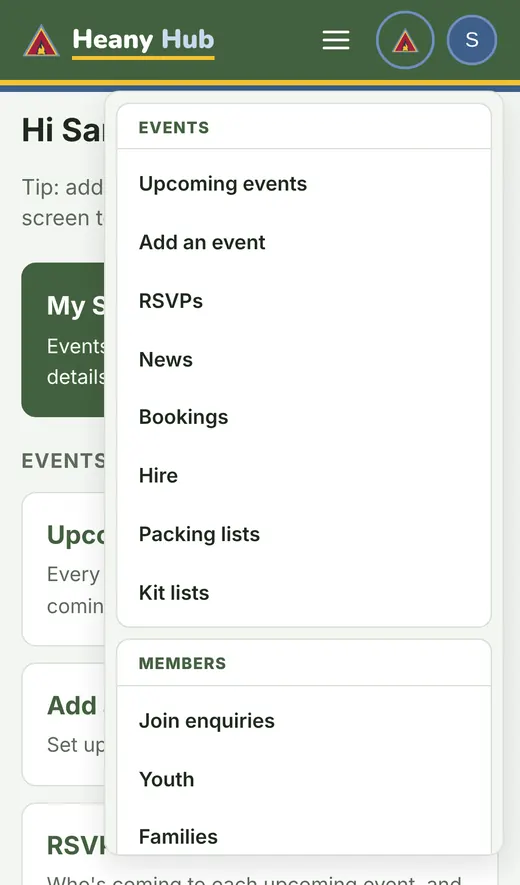
After you sign in you see a button for every part you are allowed to use, grouped the same way as the menus across the top: Events, Members, Equipment, Money and Help & FAQ. A number beside a menu shows how many things are waiting there.
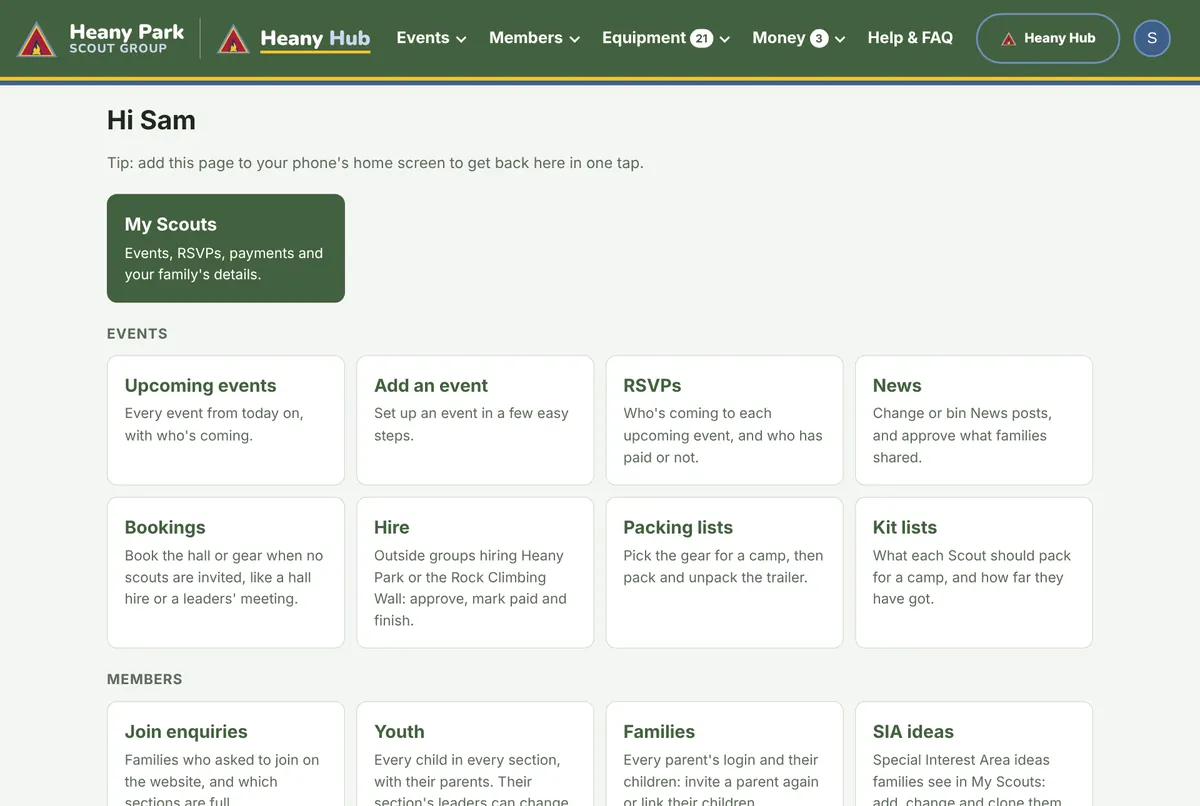
Press a menu name to see its pages. Press the Heany Hub logo at the top left to come back to this page from anywhere. To find this guide again, press Leader Guide under Help. When you are signed in, the Heany Hub logo at the top of this guide also takes you back.
Getting help
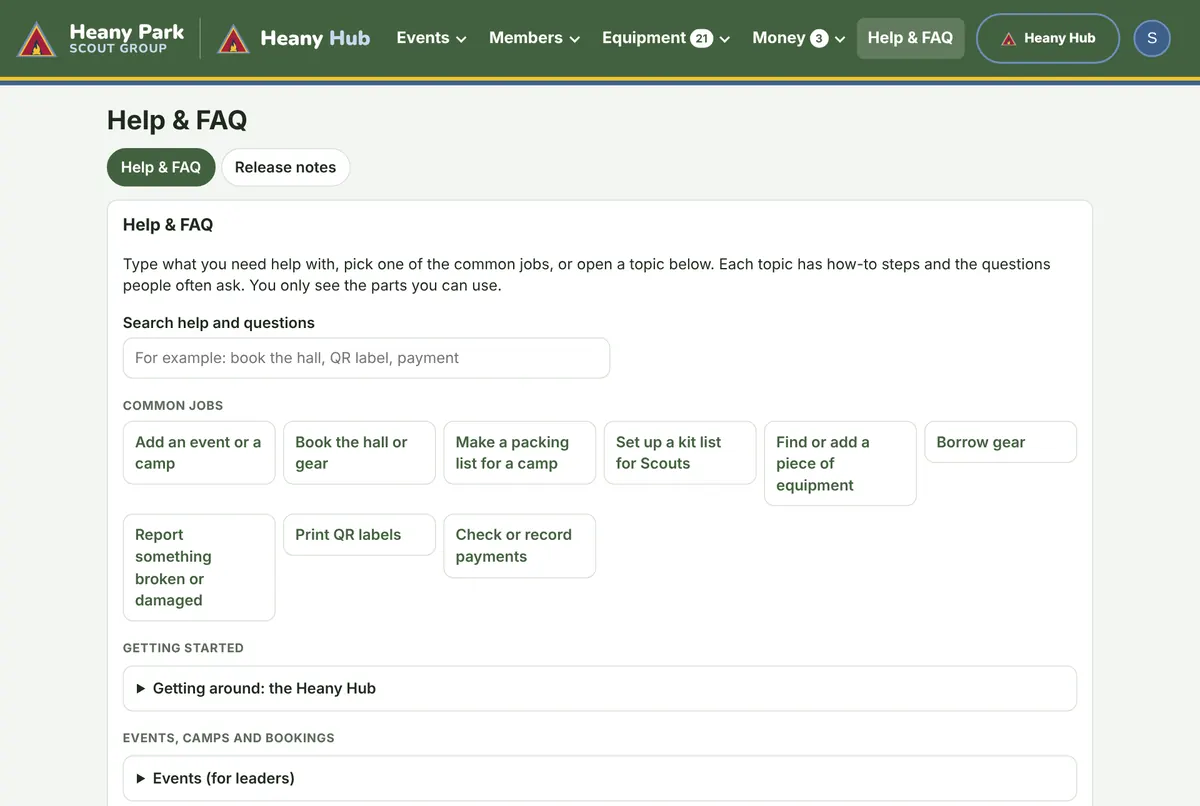
Help & FAQ (in the top menu) has the full instructions for every page. Type a word or two in the search box, such as "refund" or "QR label", or press one of the Common jobs.
A page you can't open says "Not available". If you think you should have access, ask the Group Leader. Still stuck? Talk to Rob or Jonathon.
Adding an event
Every week night, camp, hike or outing is an event. Adding one takes four short pages, and nothing goes to families until you press Publish on the last page.
Page 1: The basics
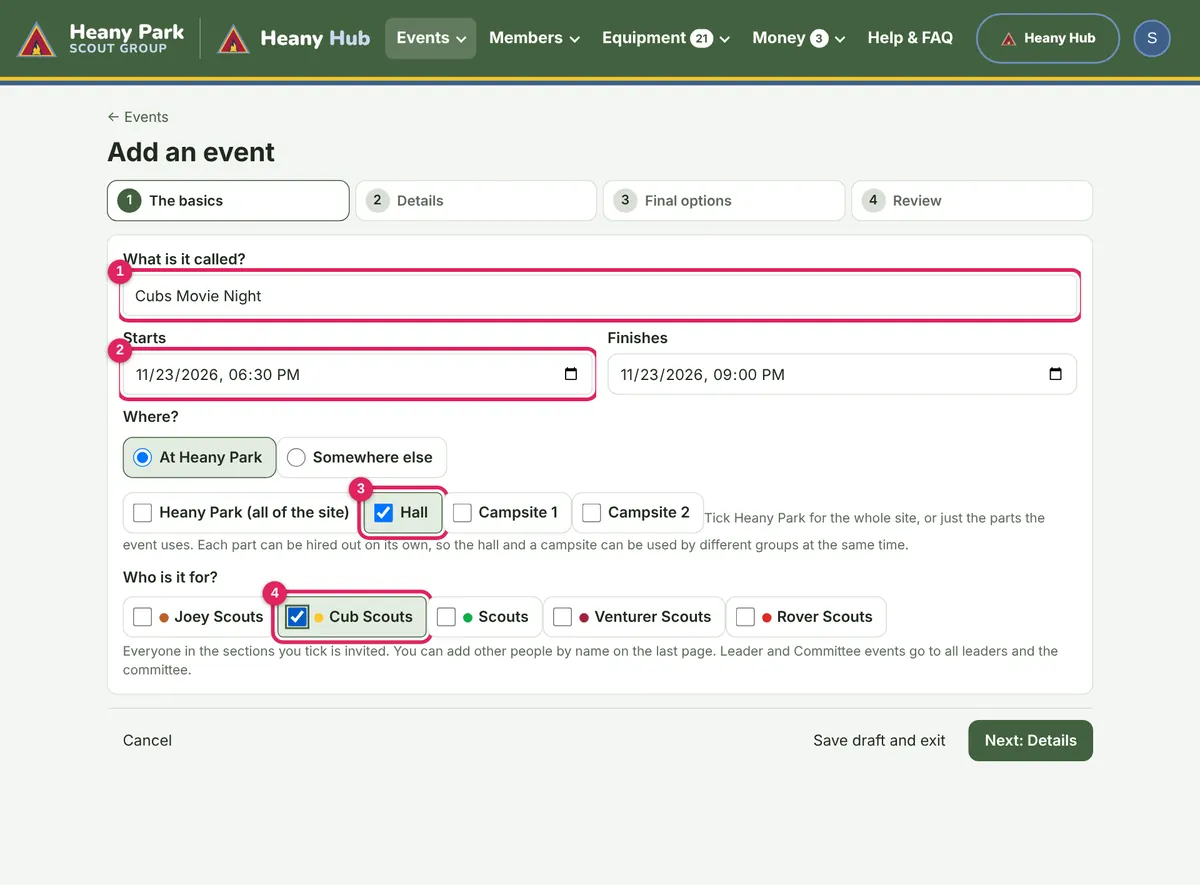
- Open Events > Add an event.
- Type the event's name, and when it starts and finishes.
- Under Where?, choose At Heany Park and tick the parts you'll use (the Hall, Campsite 1, Campsite 2, or all of Heany Park), or choose Somewhere else and type the place.
- Tick the sections it is for. Everyone in those sections is invited.
- Press Next: Details.
Page 2: Details
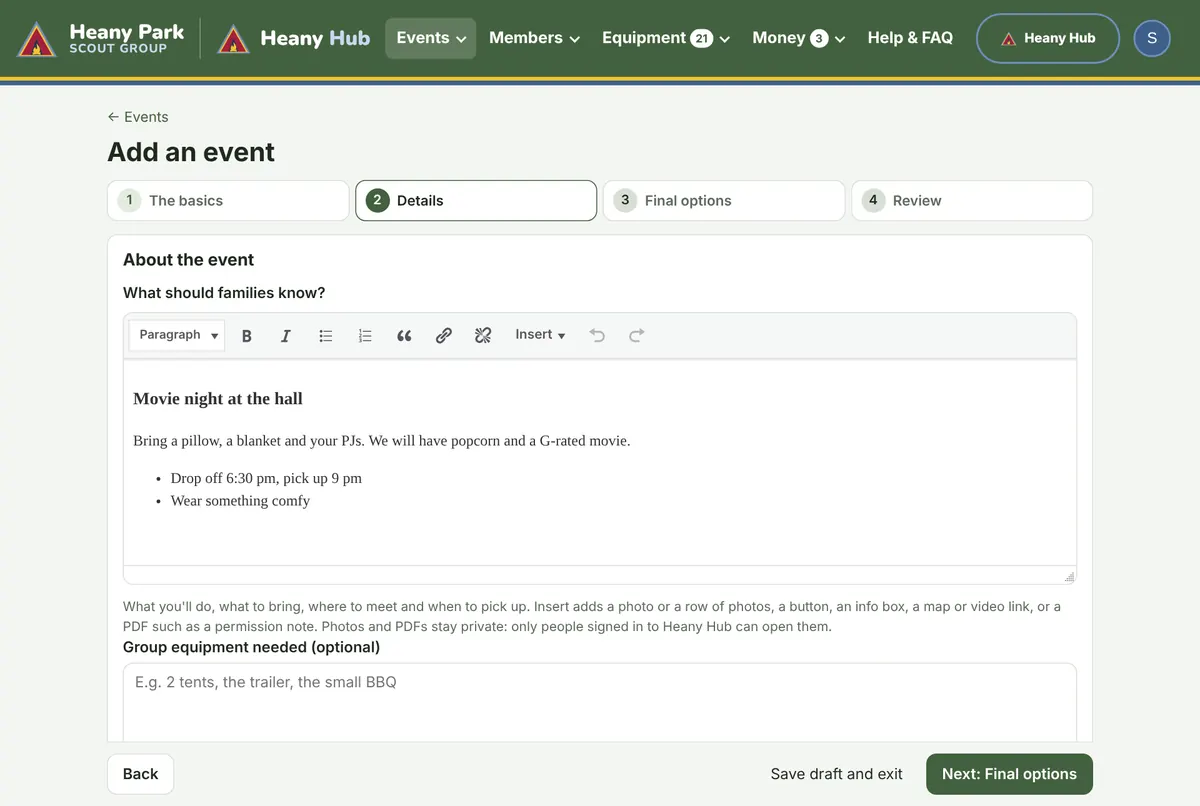
Write what families should know. The box works like a small word processor: headings, bold, lists and links. Insert adds a photo, a button, a yellow info box, a map or video link, or a PDF such as a permission note. Photos and PDFs stay private to signed-in families.
Then answer two questions:
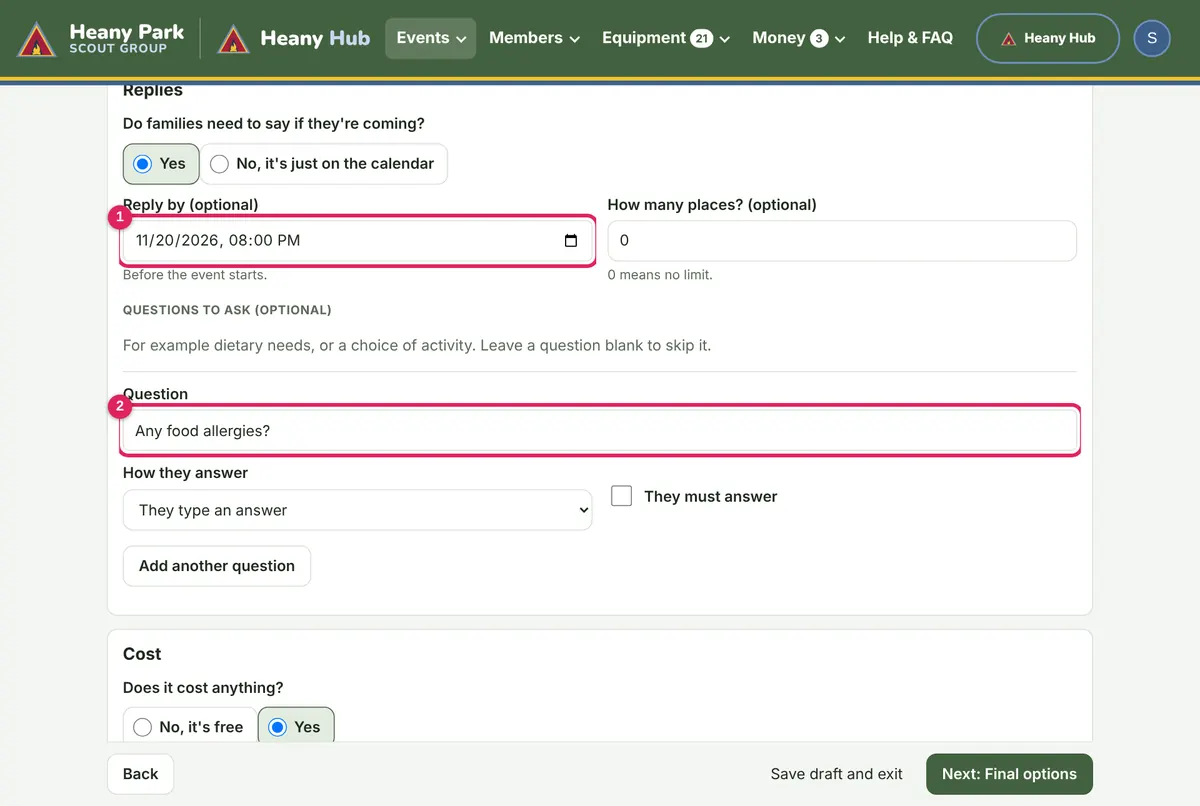
- Do families need to say if they're coming? Choose Yes for camps and outings. You can set a reply-by date, a limit on places, and questions to ask, such as food allergies. Choose No, it's just on the calendar for ordinary week nights.
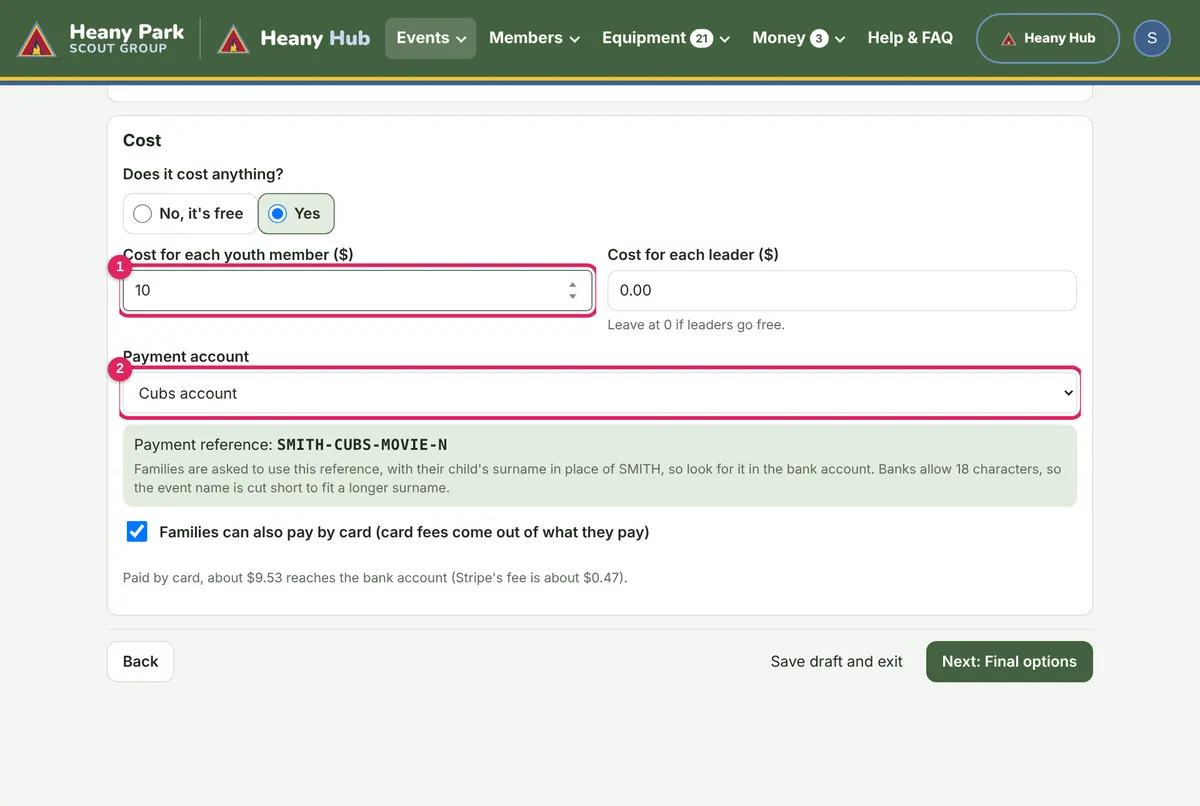
- Does it cost anything? Choose Yes, type the cost for each youth member (and for leaders, if they pay), and choose the bank account the money goes into.
Page 3: Final options
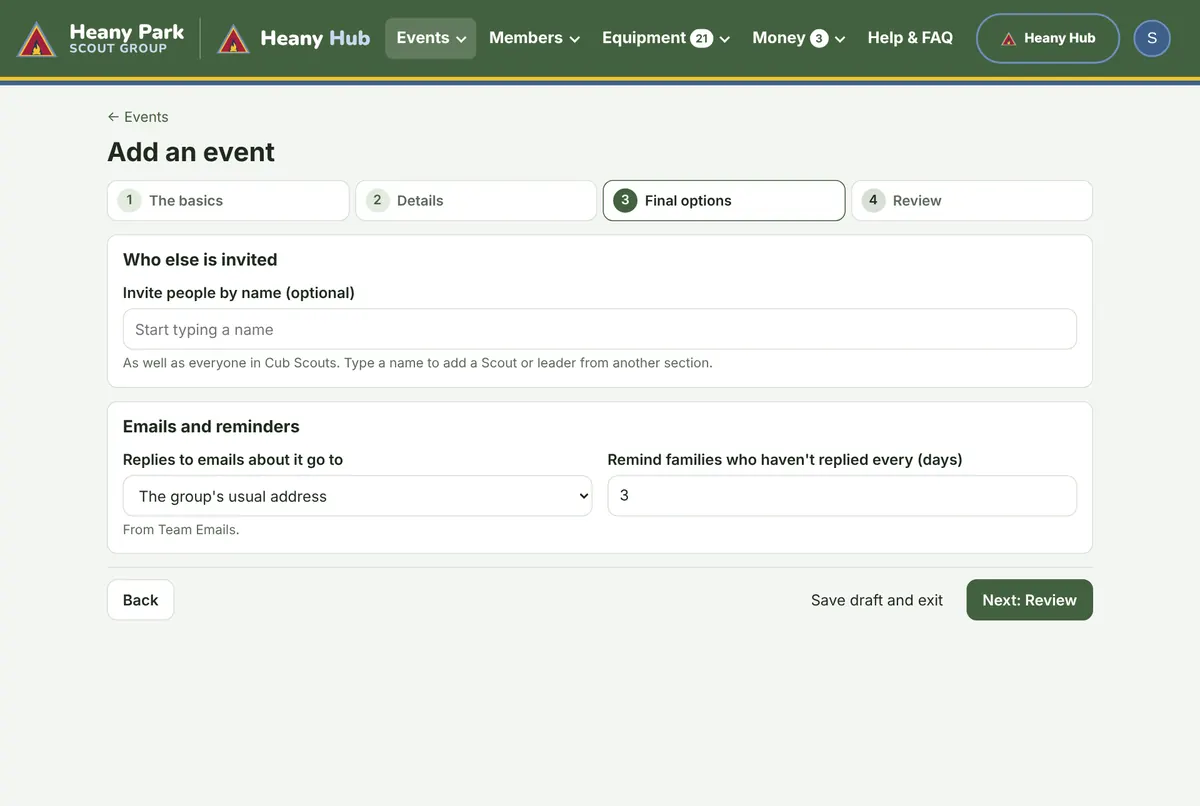
Most events need nothing here. You can invite extra people by name (for example a Scout helping at a Cubs night), choose where replies to the event's emails go, and how often families who haven't replied get a reminder. Replies go to the mailbox of the section you ticked (cubs@ for a Cubs event, for example). The section's mailbox in the list shows the address it will use, so you can check it.
Page 4: Review and publish
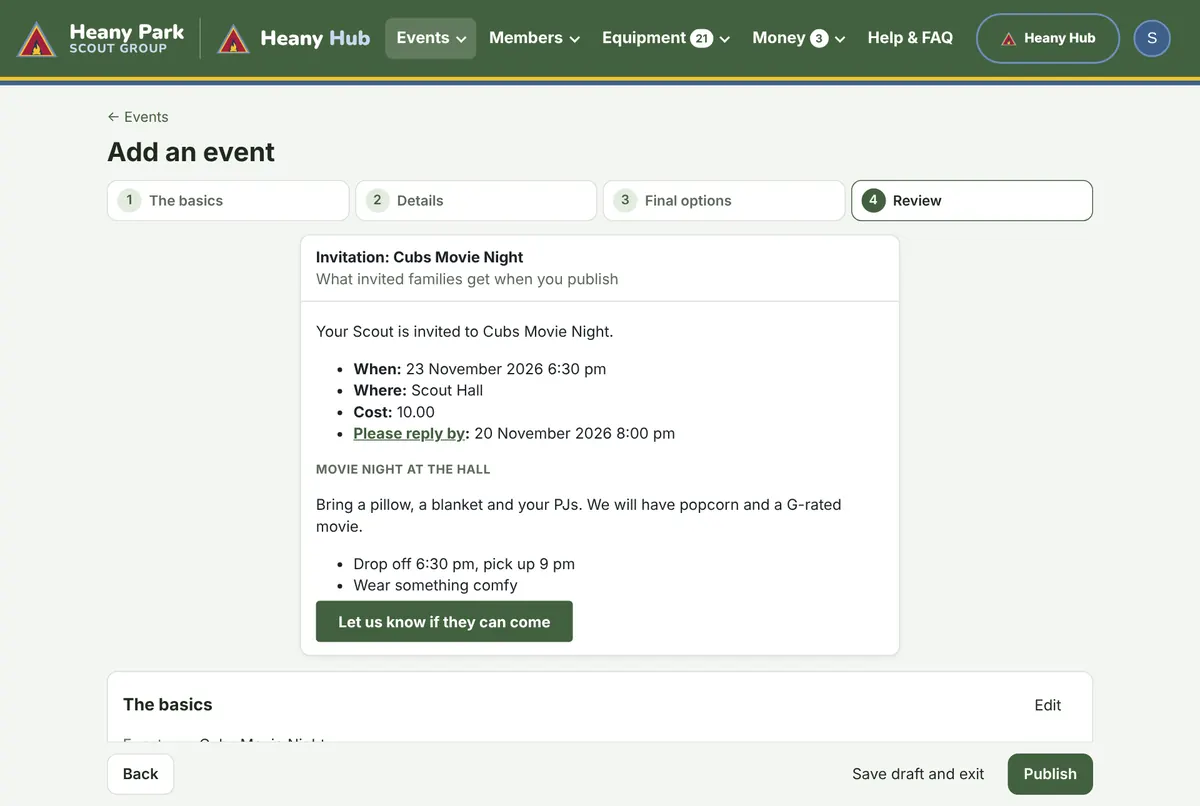
- Check the invitation at the top. It is exactly what families will get by email.
- Check the settings underneath. Press Edit beside any part to change it.
- Press Publish. The event goes live and invited families are emailed.
Your event's page
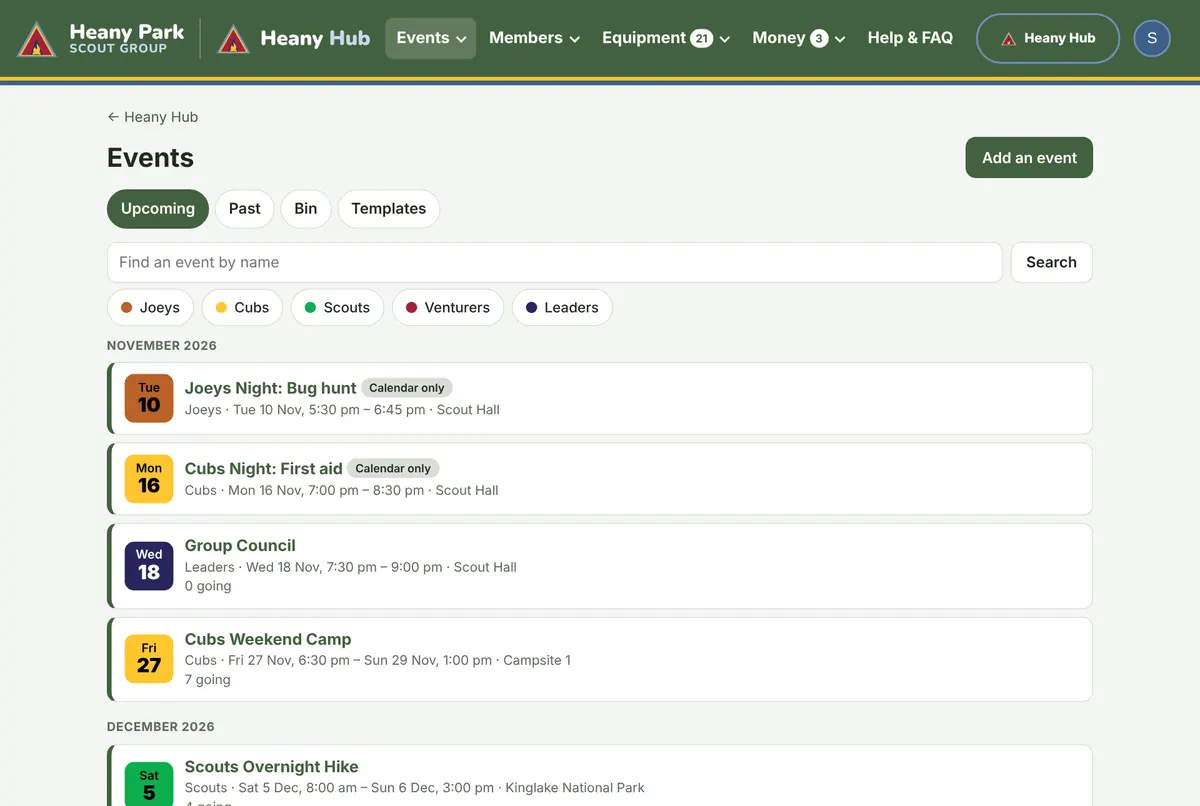
Each event has its own page with everything about it. Open it from Events > Upcoming events.
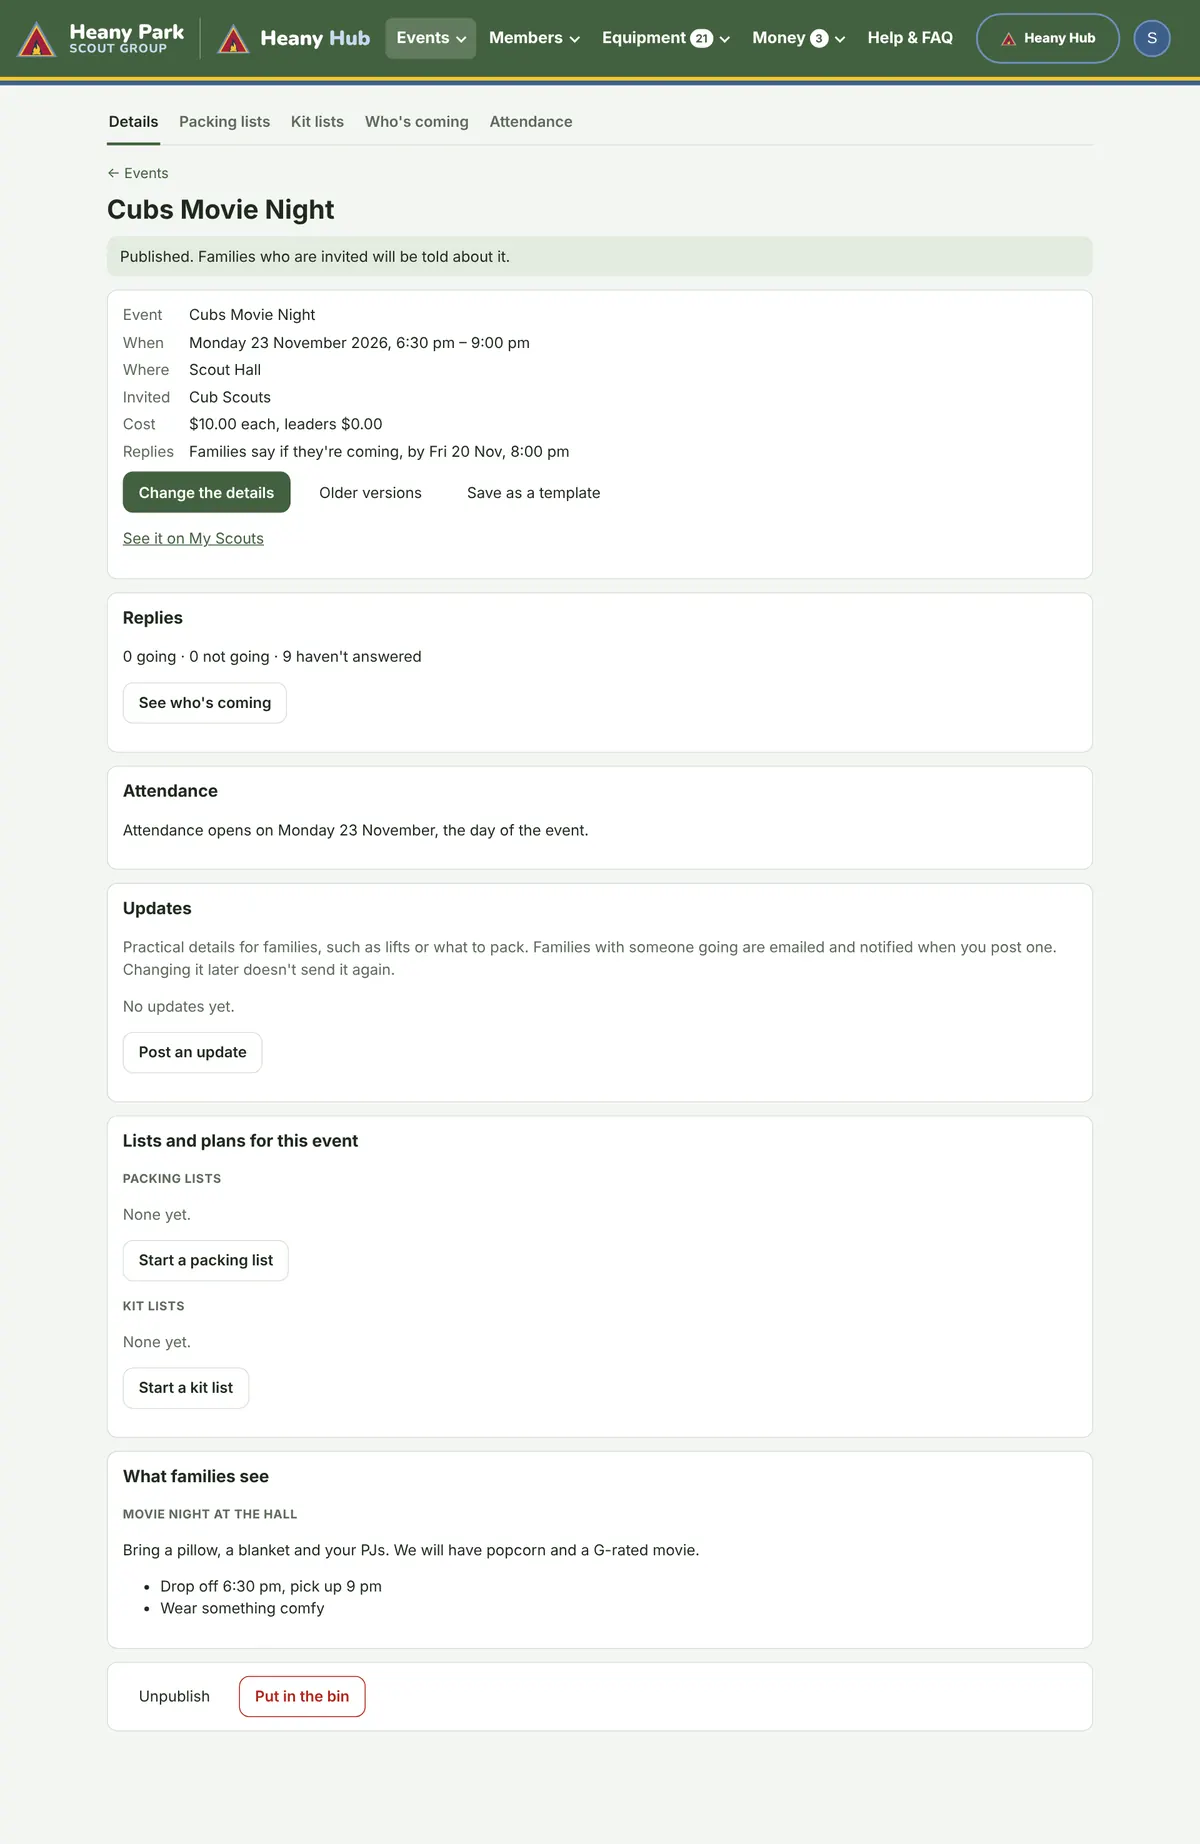
- Tabs along the top take you to the event's Packing lists, Kit lists, Who's coming and Attendance.
- Change the details opens the same four pages again. Changing a published event emails families only when its dates move or replies open; post an update for anything else they need to know.
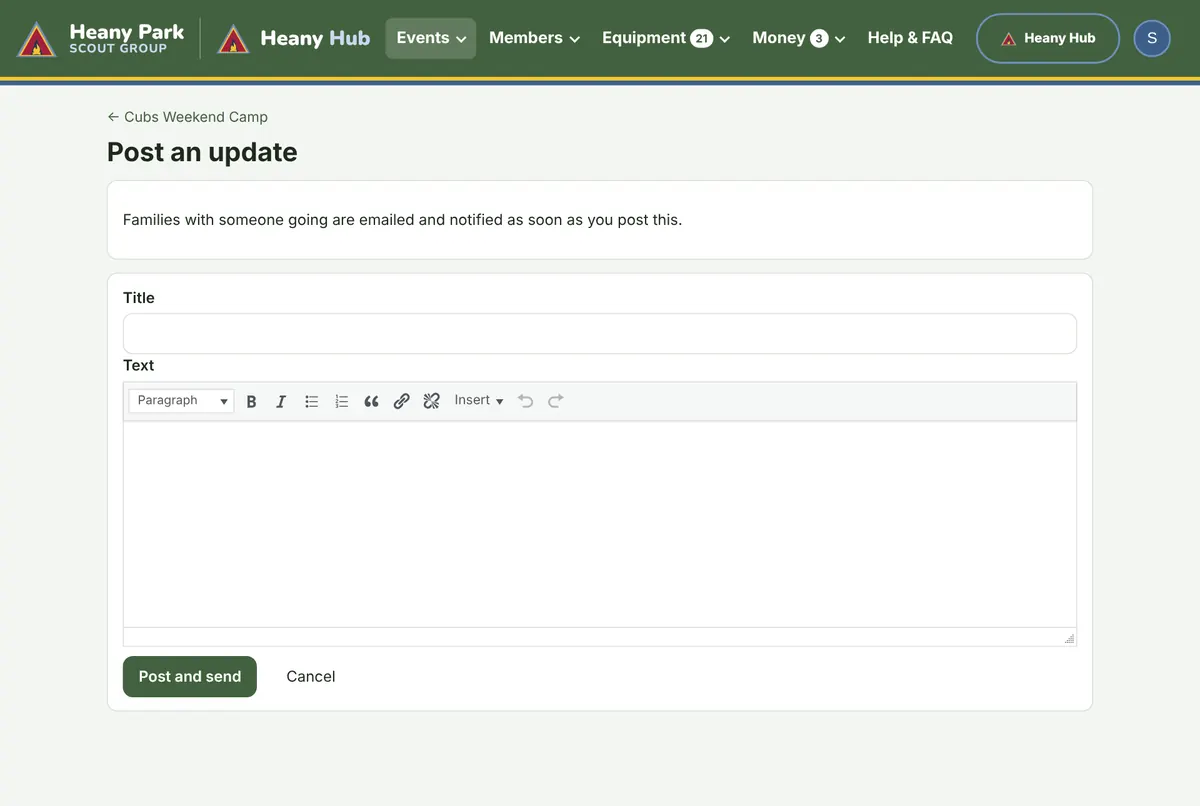
- Updates: press Post an update for practical details such as lifts or what to pack. Families with someone going are emailed straight away.
- Lists and plans for this event: start a packing list, a kit list or a camp cost plan already linked to the event.
- Save as a template keeps a copy for next time, such as "Cubs weekend camp".
- Older versions lists each saved version of the event's name and description, to look at or bring back. Nobody is emailed.
- See it on My Scouts shows the event exactly as families see it.
- Unpublish turns it back into a draft. Put in the bin takes it away (you can bring it back from the Bin tab for 30 days). Neither tells families, so post an update or an urgent notice first.
Who's coming and payments
For events that ask families to reply, Heany Hub keeps track of who is going and who has paid.
The RSVPs page
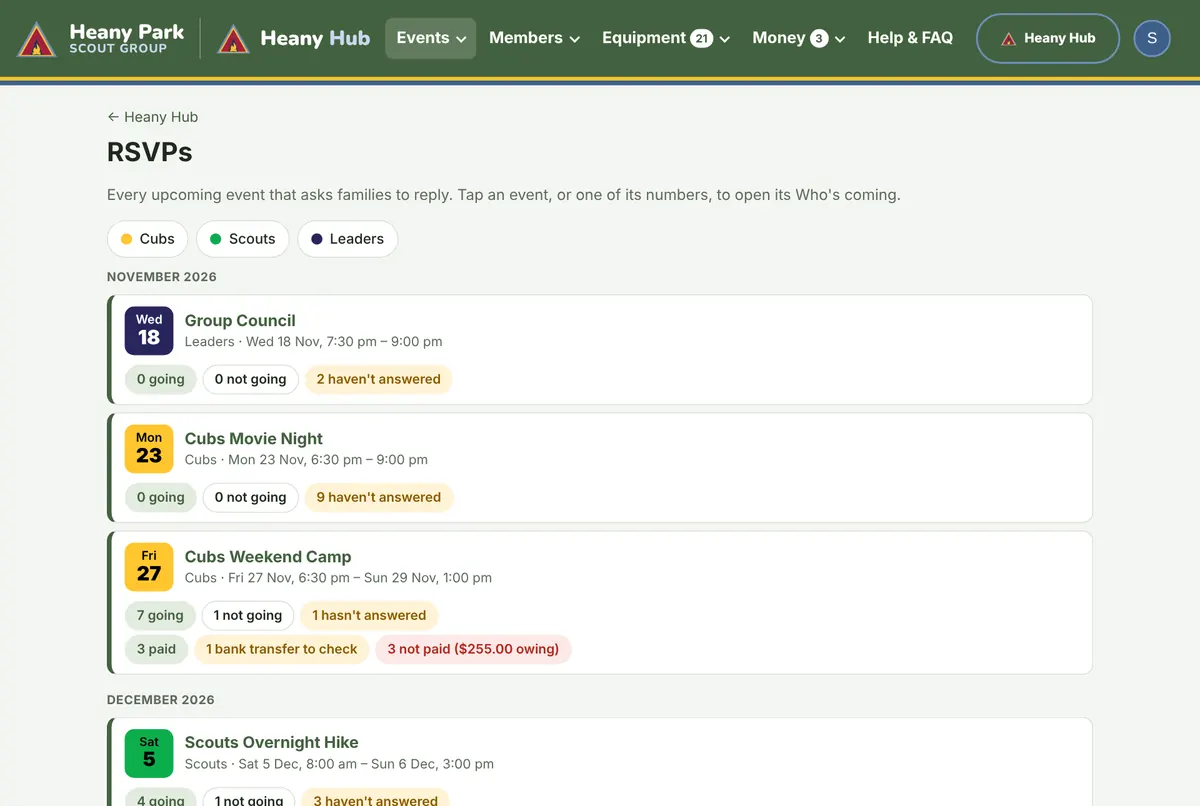
Events > RSVPs lists every upcoming event that asks for replies, with how many are going, not going and haven't answered, and for paid events how many have paid. Tap an event, or one of its numbers, to see the people.
Who's coming
Each event's Who's coming tab lists everyone invited, with their parents, their answers to your questions, and how they paid.
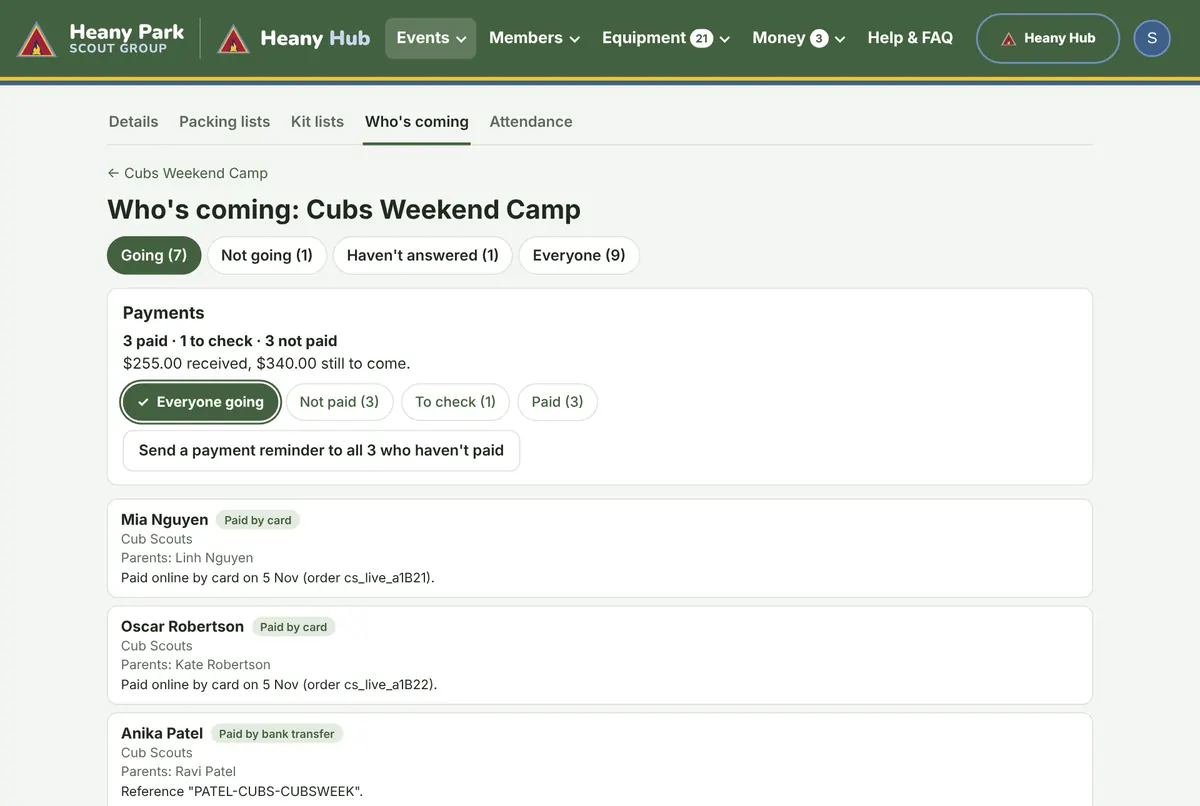
Each person going shows one of these:
- Paid by card: paid online. Nothing to do.
- Paid by bank transfer: someone has already checked the bank.
- Bank transfer to check: the parent says they paid, but nobody has checked the bank yet.
- Not paid, with how much is owing.
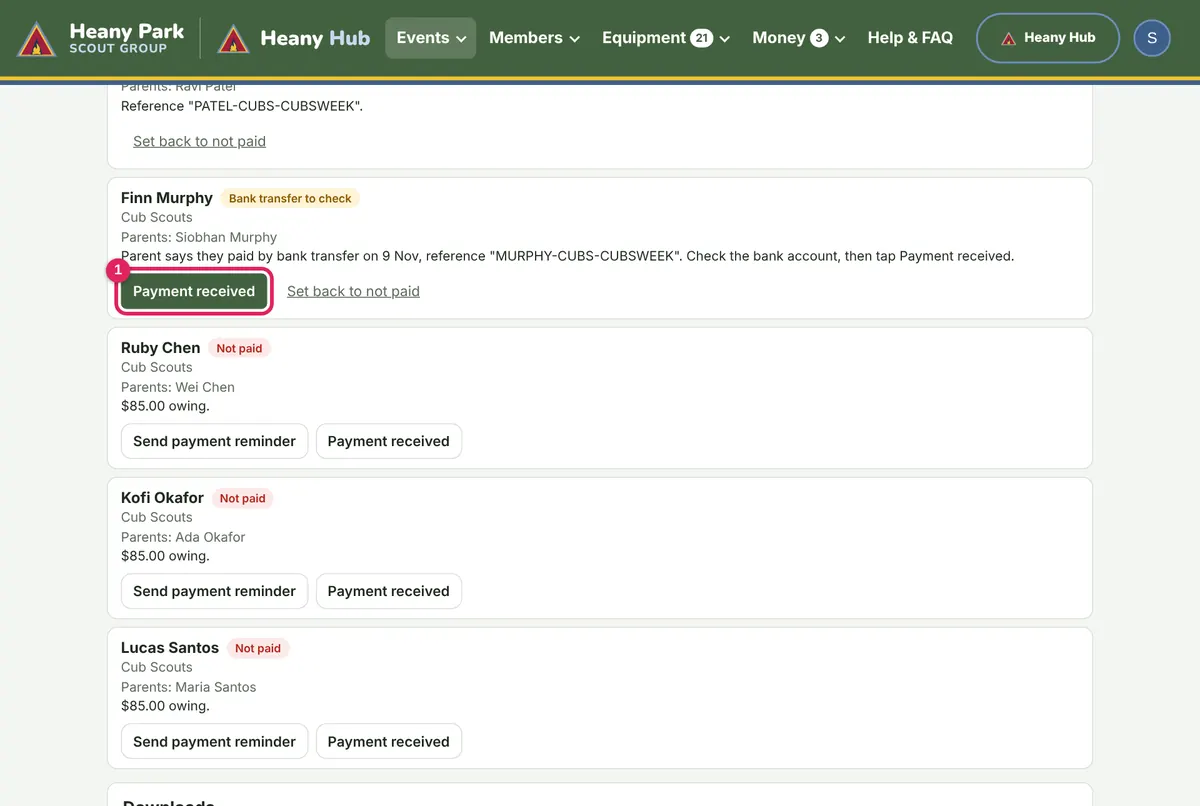
Recording a bank transfer
- Check the money is in the section's bank account, using the reference shown.
- Press Payment received beside the person.
Reminders
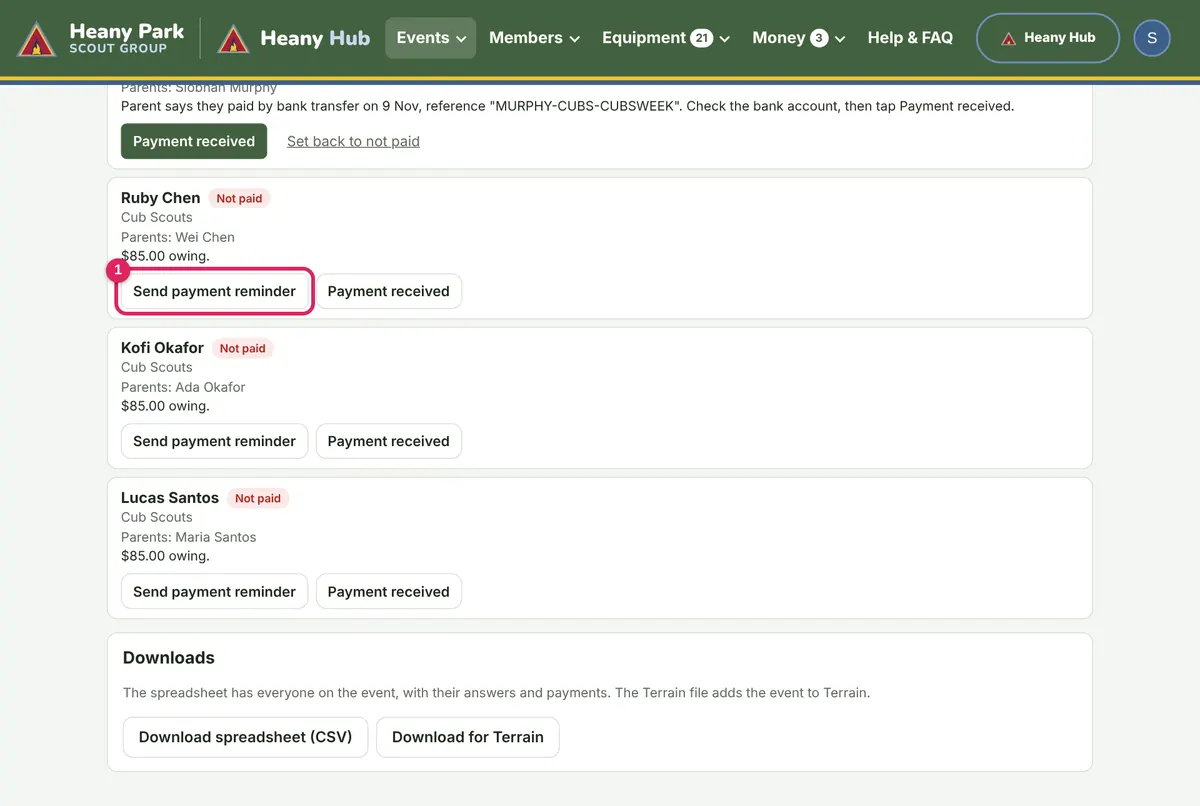
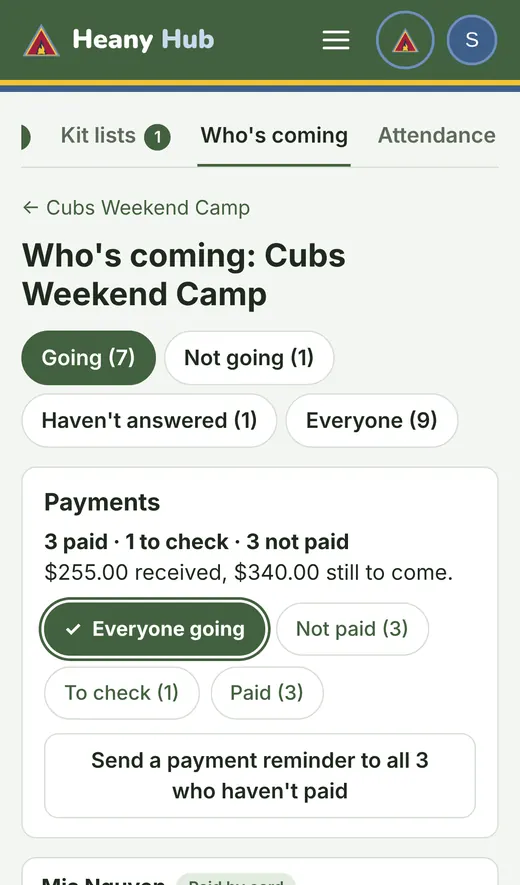
Send payment reminder emails the parents of someone who hasn't paid. The Payments box has a button to remind everyone who hasn't paid at once. On the Haven't answered list, Send reminder asks a family to reply. Several children of one parent always go in one email.
Roll call and Finalise Night
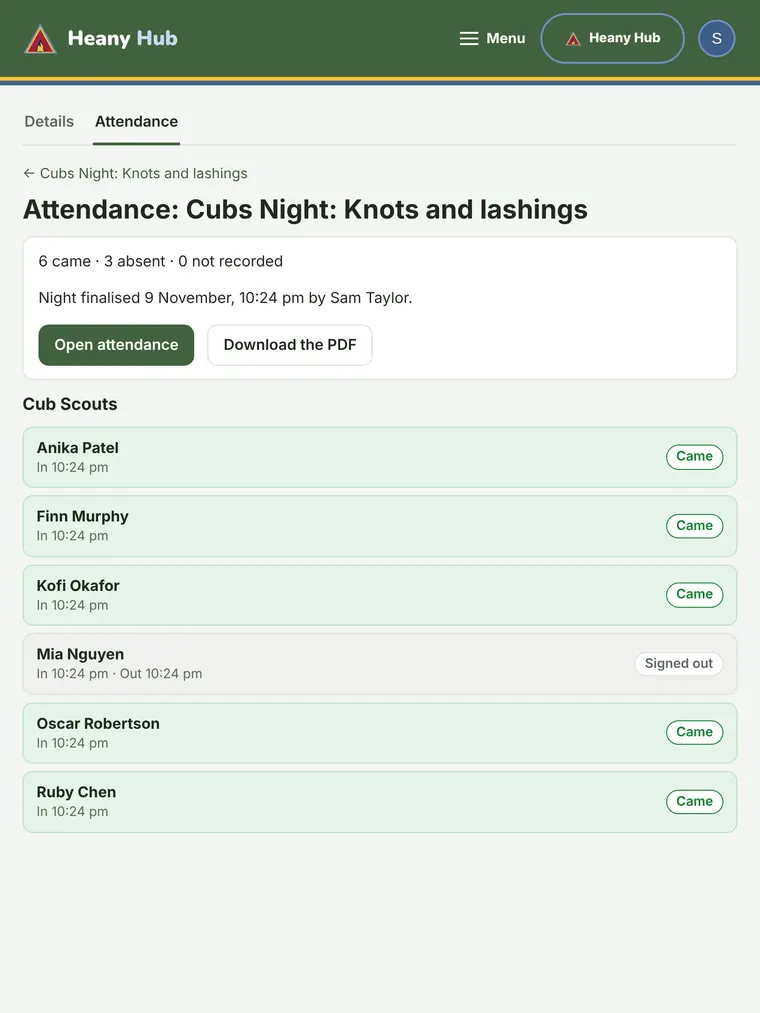
Take the roll on your phone, an iPad or the hall iPad. Every event has an Attendance tab, whether families reply to it or not.
Taking the roll
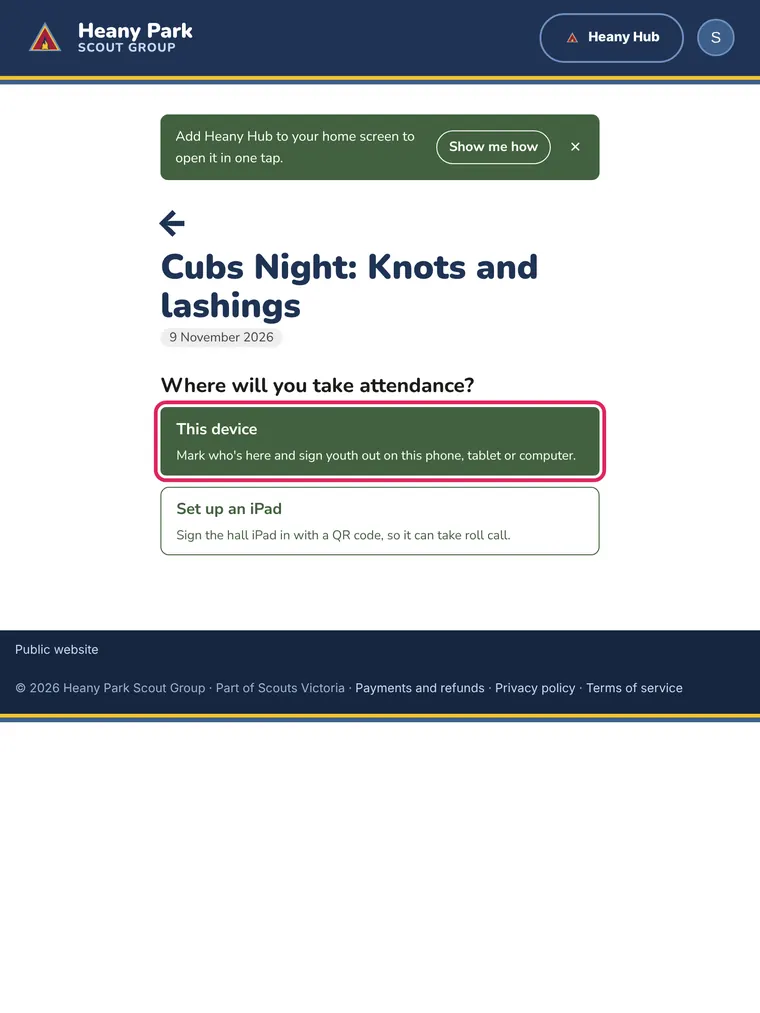
- Open the event and go to the Attendance tab. Press Take attendance. (It opens on the day of the event.)
- Choose This device to take the roll on the phone or tablet you're holding, or Set up an iPad to sign the hall iPad in with a QR code.
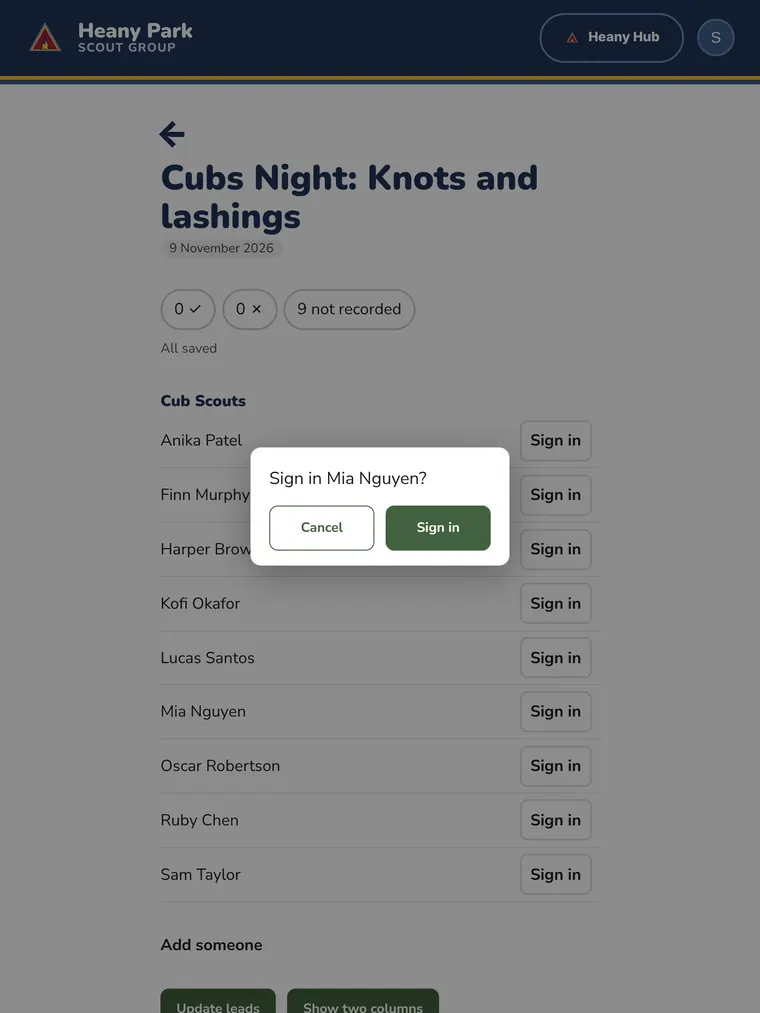
- As each youth member arrives, tap Sign in beside their name, then Sign in again on the pop-up.
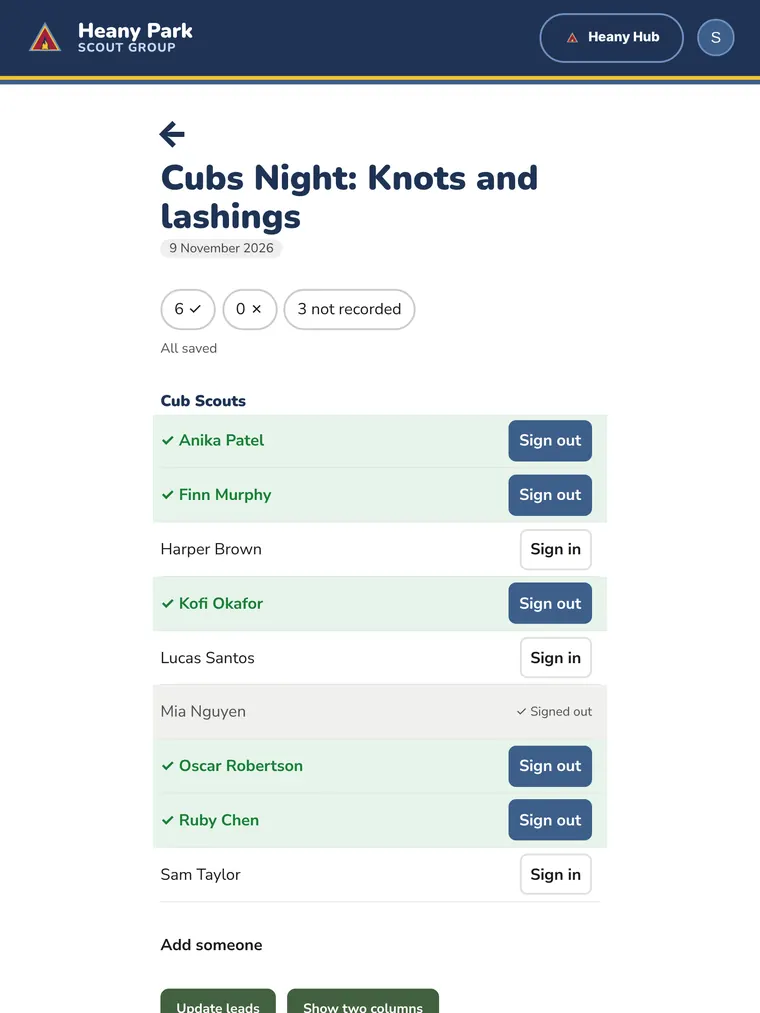
- When a youth member is collected, tap Sign out and confirm.
Finalise Night
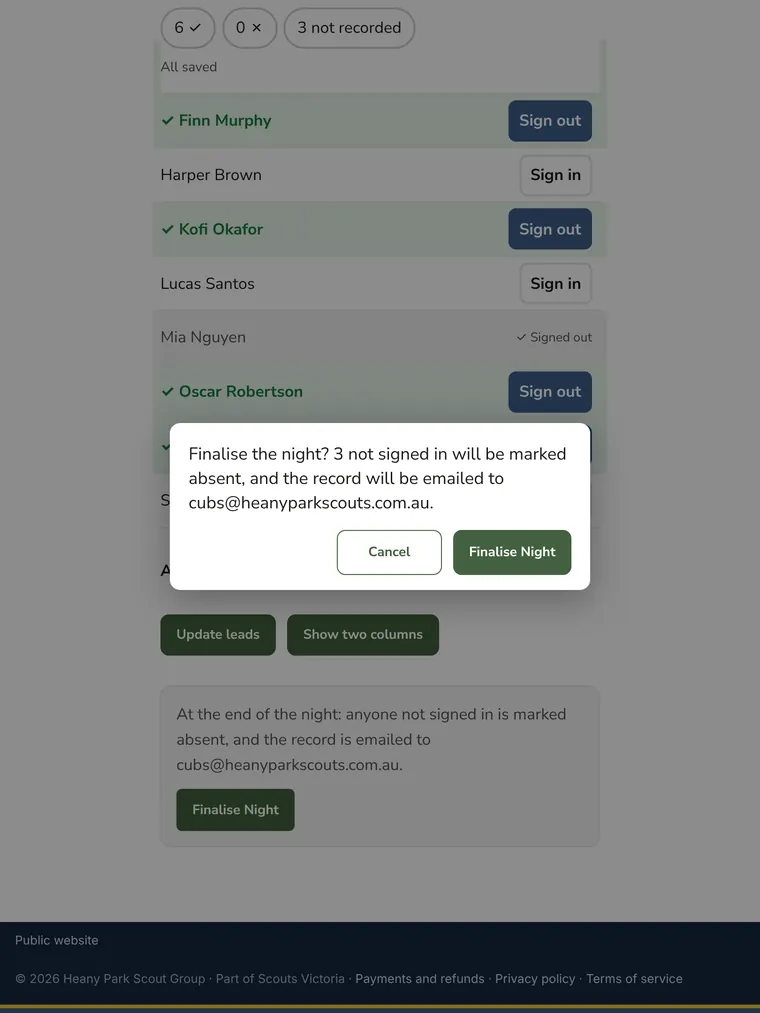
At the end of the night, press Finalise Night at the bottom of the roll and confirm twice.
- Anyone not signed in is marked Absent.
- A PDF of the night (who came, with sign-in and sign-out times, and who didn't) is emailed to the section's mailbox, such as cubs@.
- The hall iPad can then only look at the night. Leaders can still fix mistakes and download the PDF from the Attendance tab.
News and updates
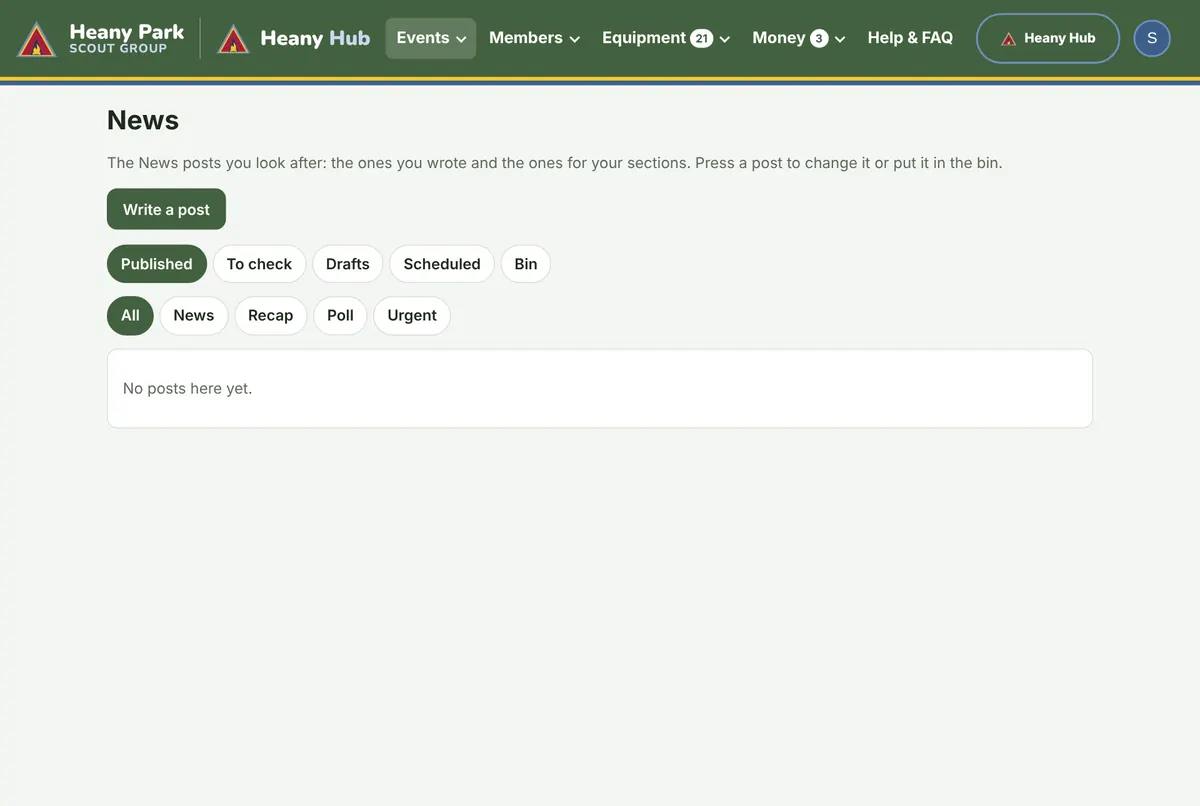
News is where families read what's happening. Leaders write posts, recaps and polls in Heany Hub, and check posts that families share.
Writing a post
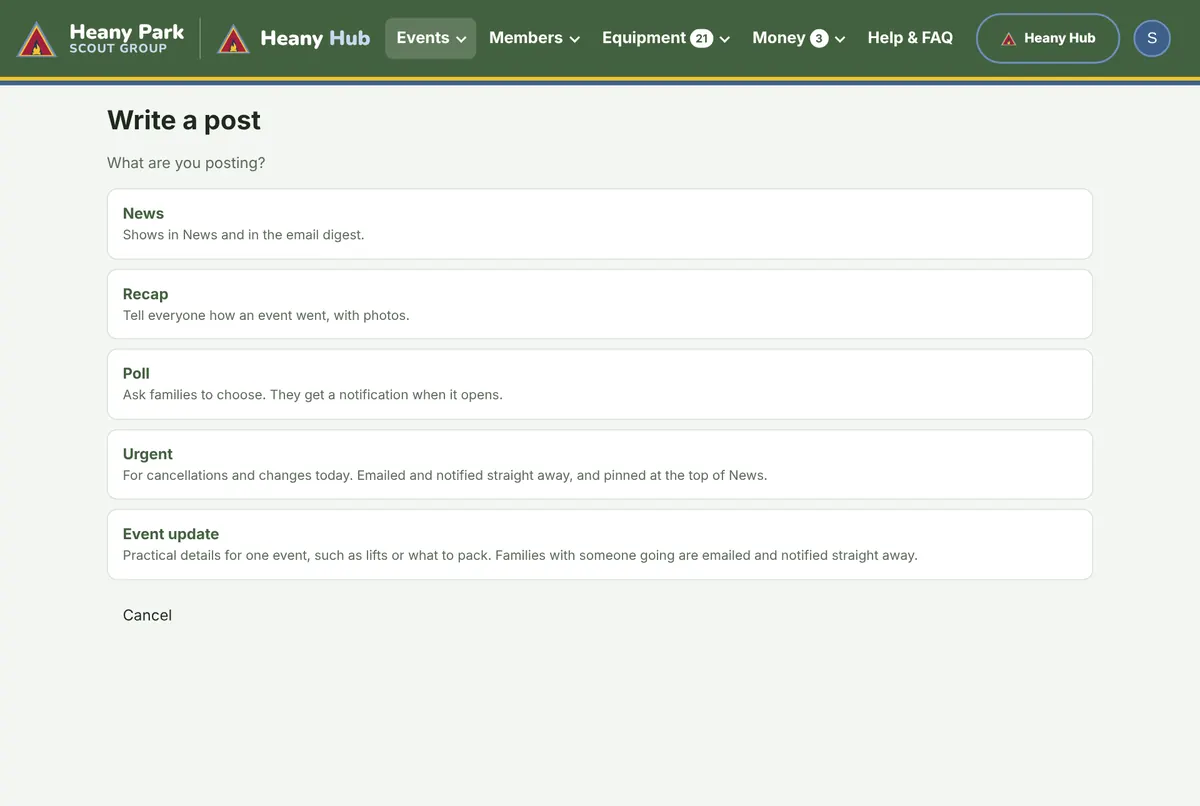
- Open Events > News and press Write a post.
- Choose what you're posting: News, Recap (with photos from an event), Poll, Urgent or Event update.
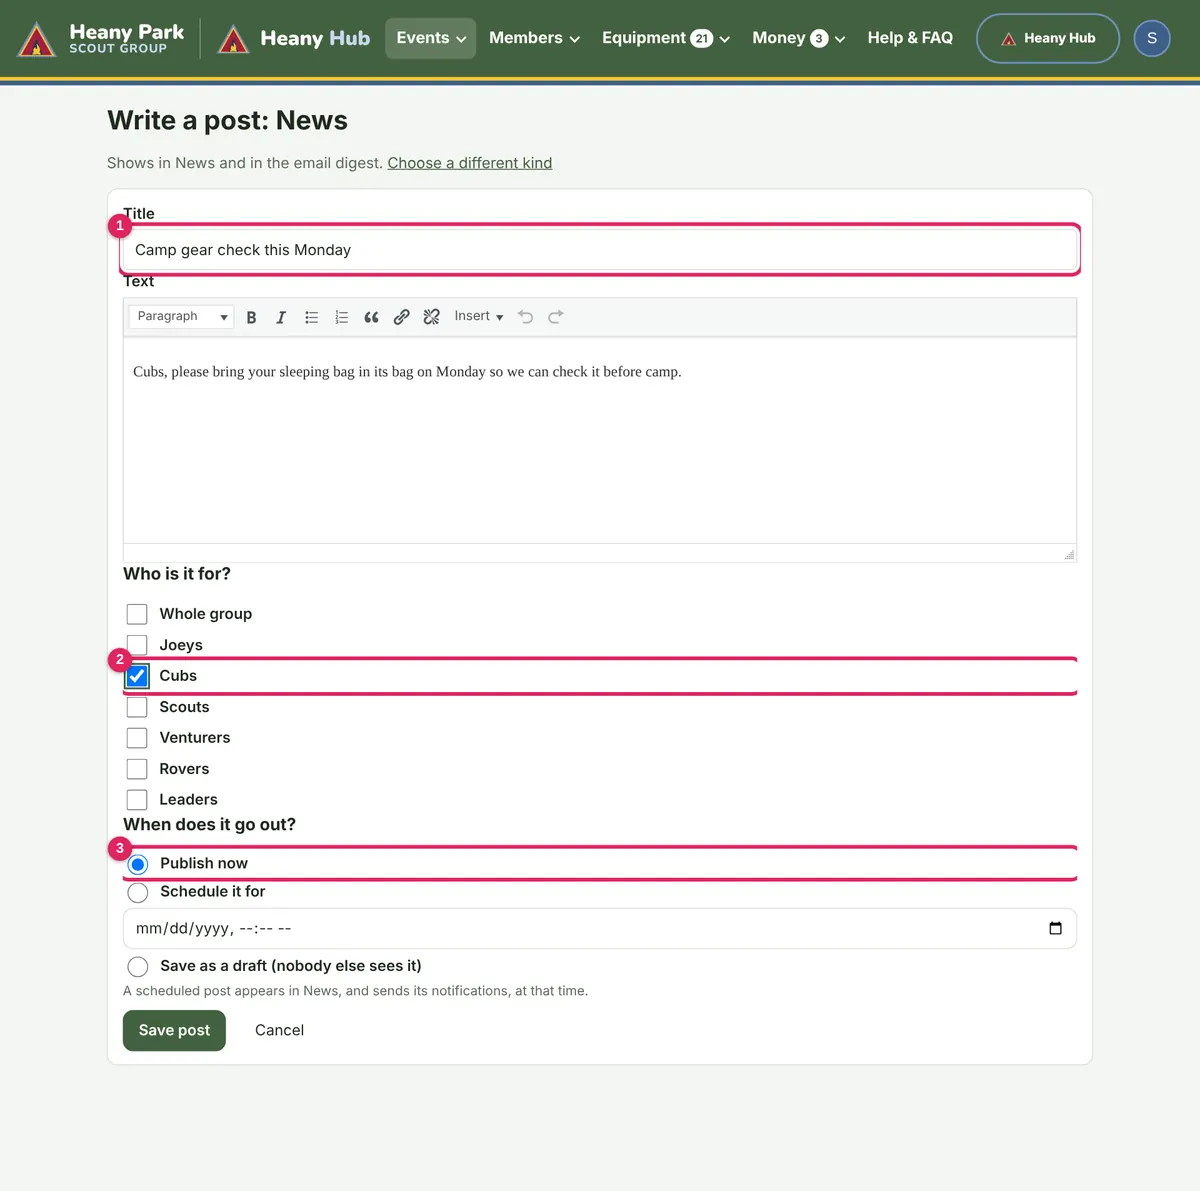
- Type the title and the text, and tick who it is for.
- Under When does it go out?, choose Publish now, Schedule it, or Save as a draft.
- Press Save post.
Urgent notices
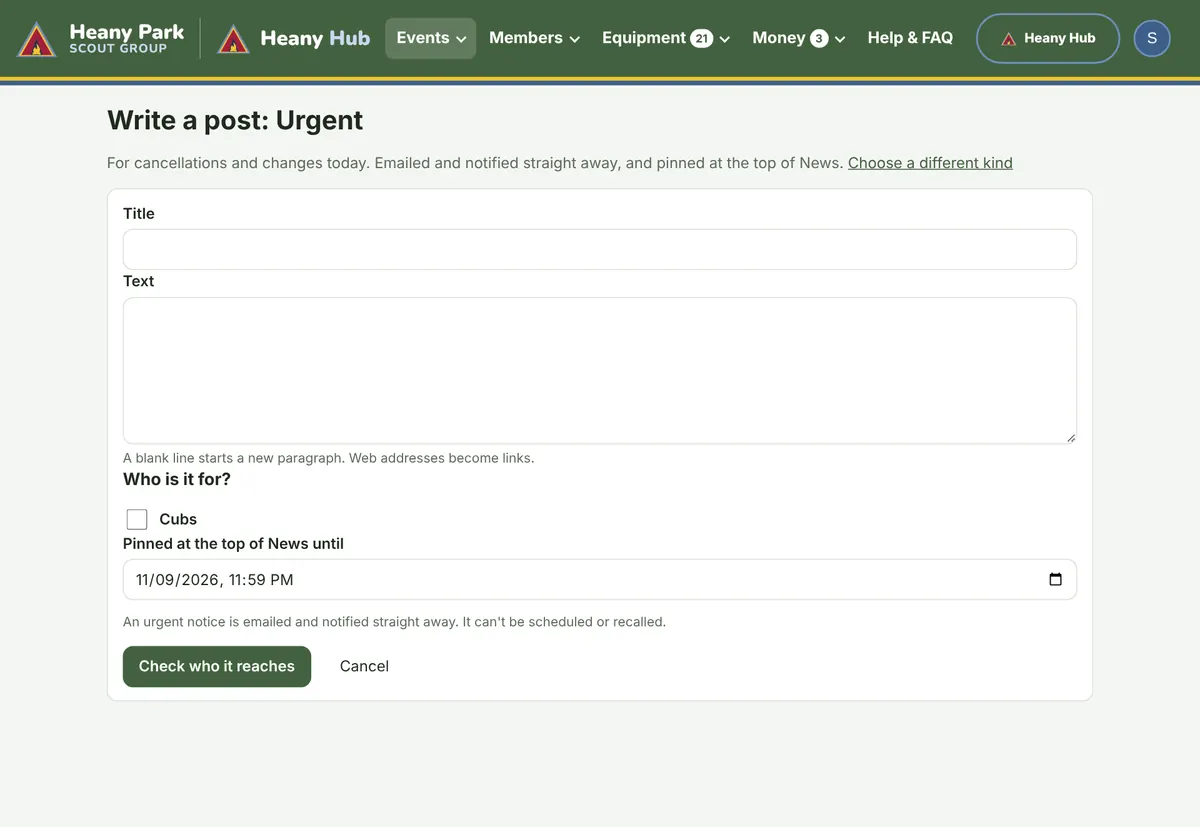
Use an urgent notice for cancellations and changes on the day. It is emailed and sent to phones straight away and pinned at the top of News. It can't be scheduled or taken back.
- Write the title and text, and tick who it is for.
- Press Check who it reaches. The page says how many people it will go to.
- Tick Send now and press Send urgent notice.
News to check
When a parent or youth member shares a post, it waits for one of their section's leaders before anyone else sees it. You get a phone notification (or an email after 12 hours). Open Events > News, To check tab, and press Approve and publish or Decline…. You can also change the wording first.
Packing the trailer
A packing list is the group gear going to a camp. Youth members or helpers pick the gear on their phones, a leader checks it, then everyone ticks things off as the trailer is packed and unpacked.
The steps are always the same: Pick the gear → Review → Pack the trailer → Unpack the trailer. The list always shows the next step as its main button.
1. Make the list
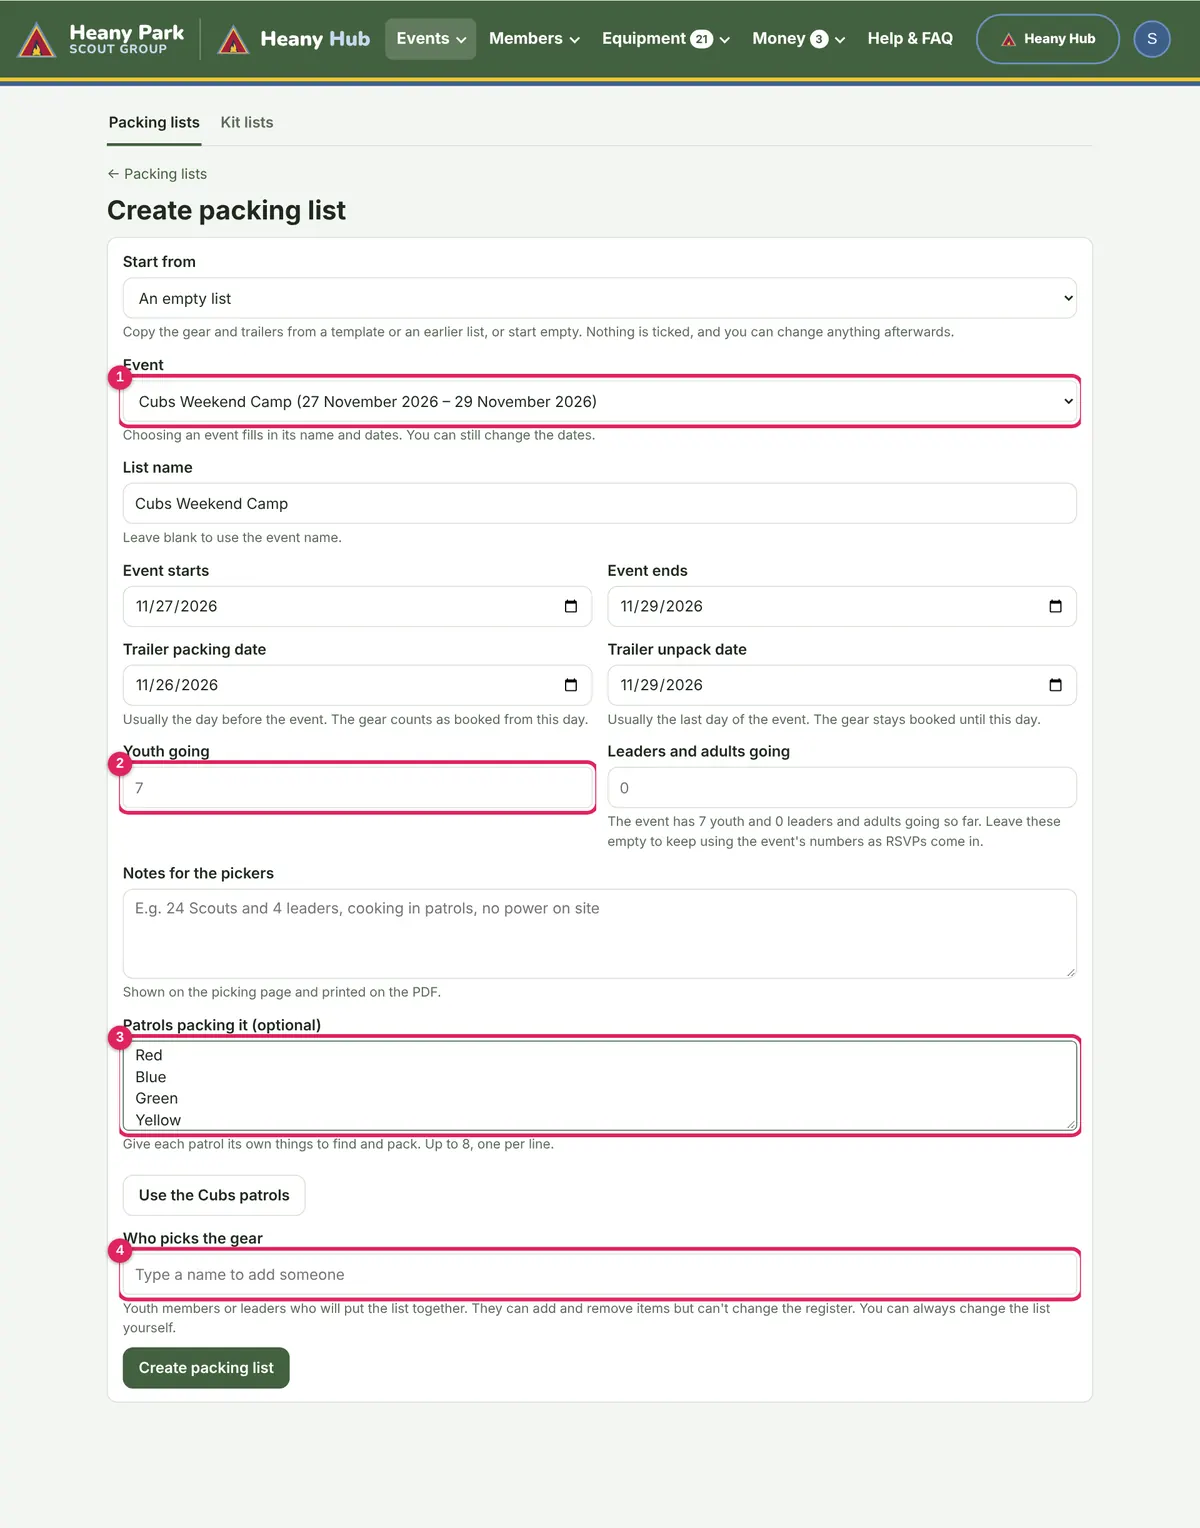
- On the event's page, press Start a packing list (or Events > Packing lists > Create packing list).
- Check the event and dates. The trailer packing date is the day before; change it if you need to.
- Optional: start from a template or last year's list, put in how many youth and leaders are going (for suggested amounts), and type the patrols packing it. Use the Cubs patrols fills those in for you.
- Type the names of the helpers who will pick the gear and choose them from the list.
- Press Create packing list.
2. Pick the gear
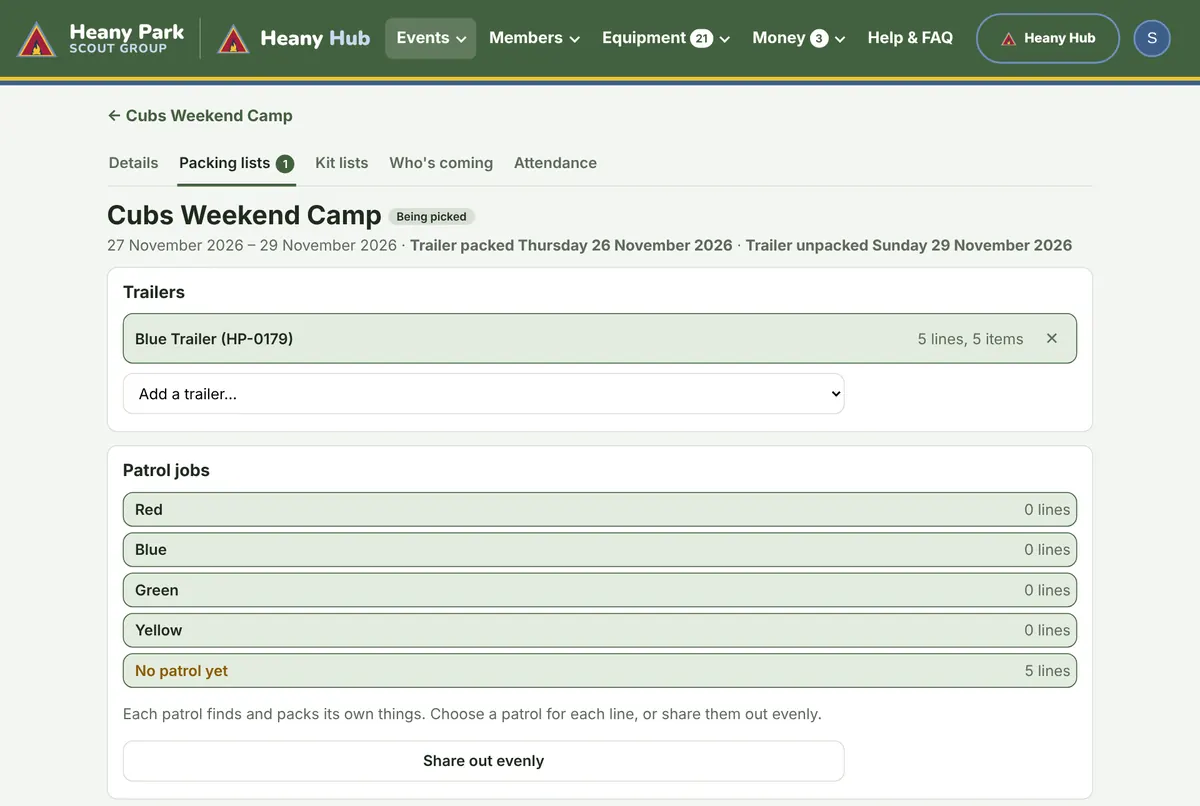
The picking page shows every piece of gear in the register, with how many are free on those dates. Add a trailer, then tap gear to add it. Gear already booked for another camp or on loan shows as taken.
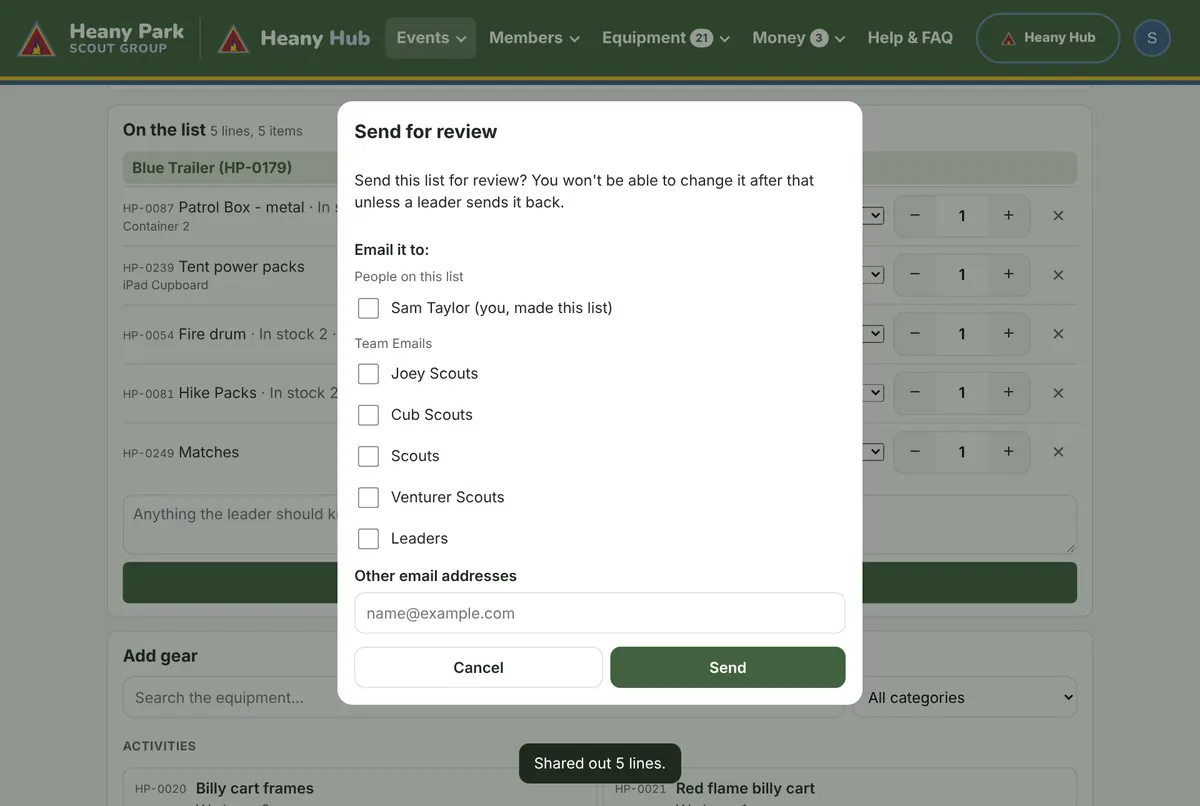
When it's done, press Send to a leader for review and choose who to email.
3. Review
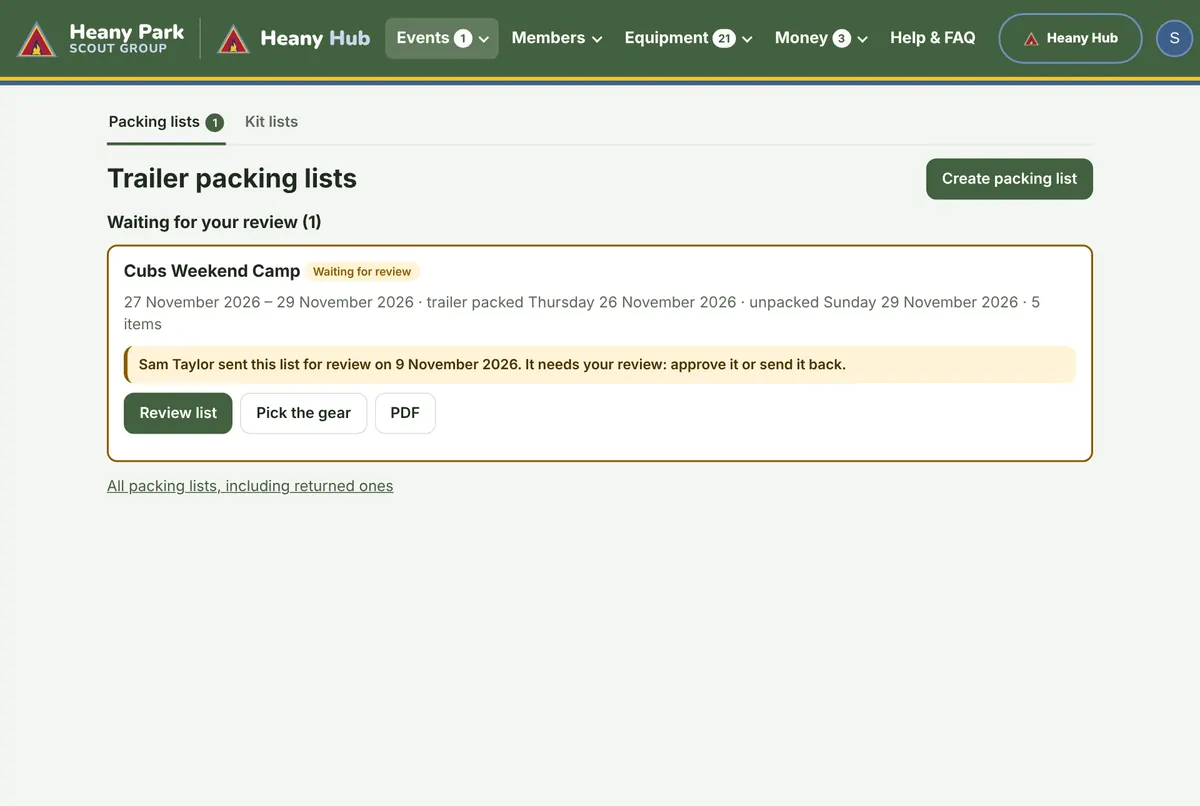
Lists waiting for you are at the top of Events > Packing lists under "Waiting for your review". Press Review list, check it, then Approve list or send it back with a note.
4. Pack and unpack
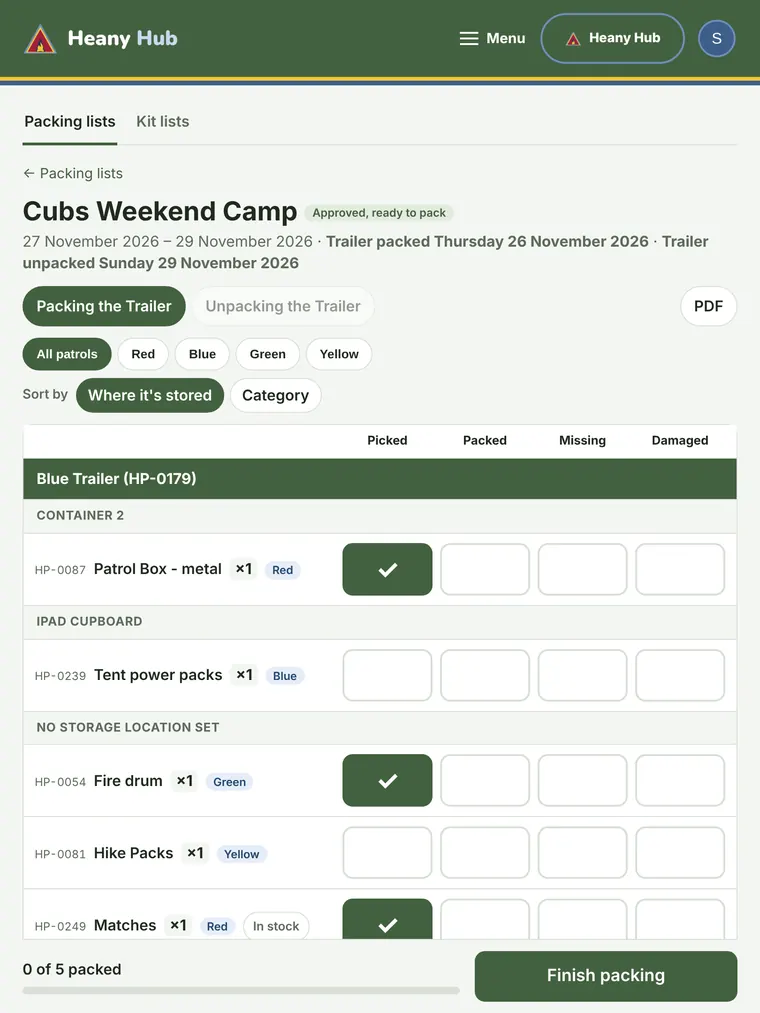
At the hall, open the list on the iPad or a phone and press Packing the Trailer. Tick Picked and Packed for each thing. Tick Missing or Damaged to report a problem with a photo. Each patrol can tap its name to see just its own jobs. After camp, use Unpacking the Trailer the same way; anything damaged or missing is emailed to the Quartermaster when you finish.
Kit lists for camps
A kit list is what each Scout brings. Each Scout going gets their own copy to tick off, on their own login or their parent's.
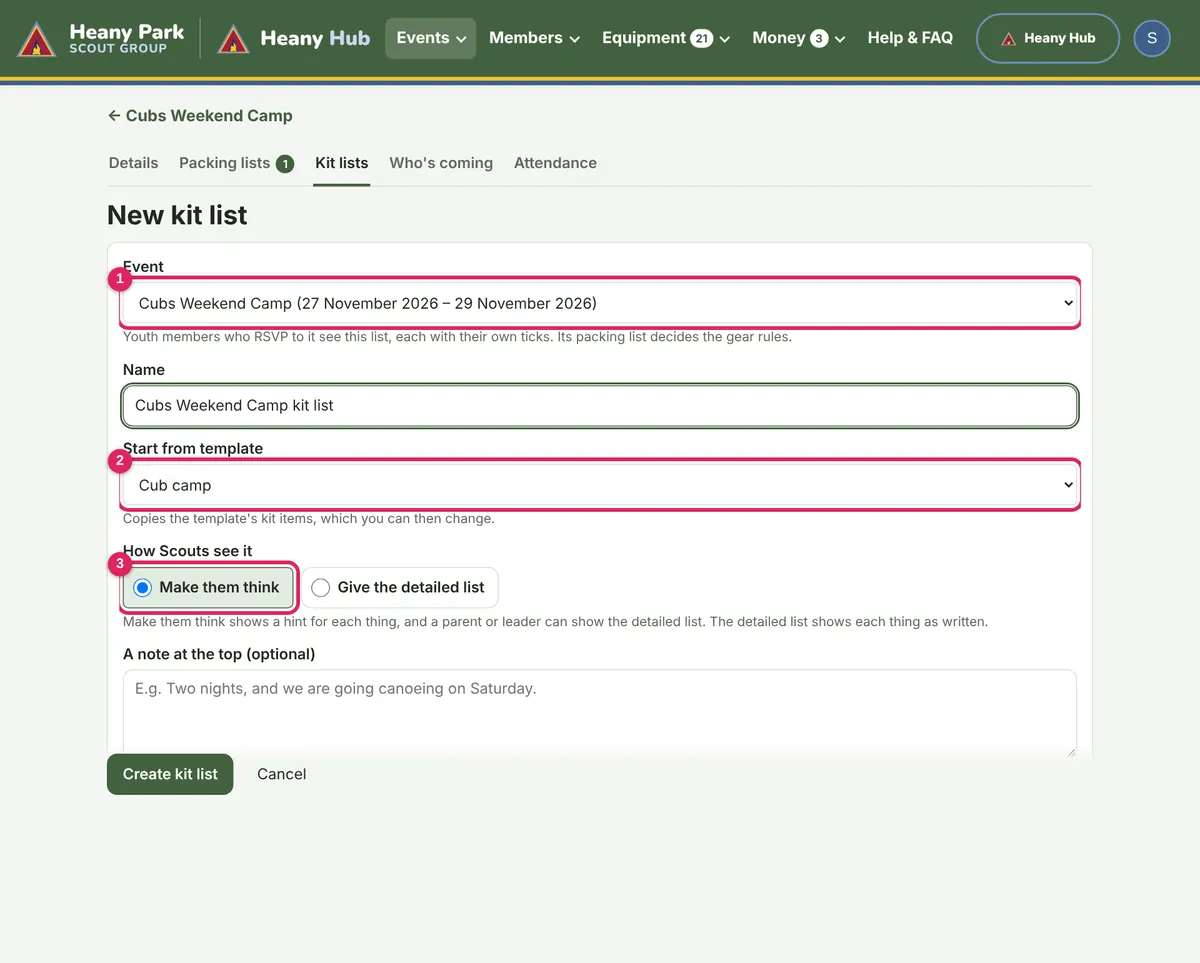
- On the event's page, press Start a kit list.
- Choose a template, such as Cub camp or Weekend camp.
- Choose how Scouts see it: Make them think (hints such as "Enough clean clothes for the whole camp") or Give the detailed list.
- Press Create kit list, tick or untick kit items for this camp, and press Save.
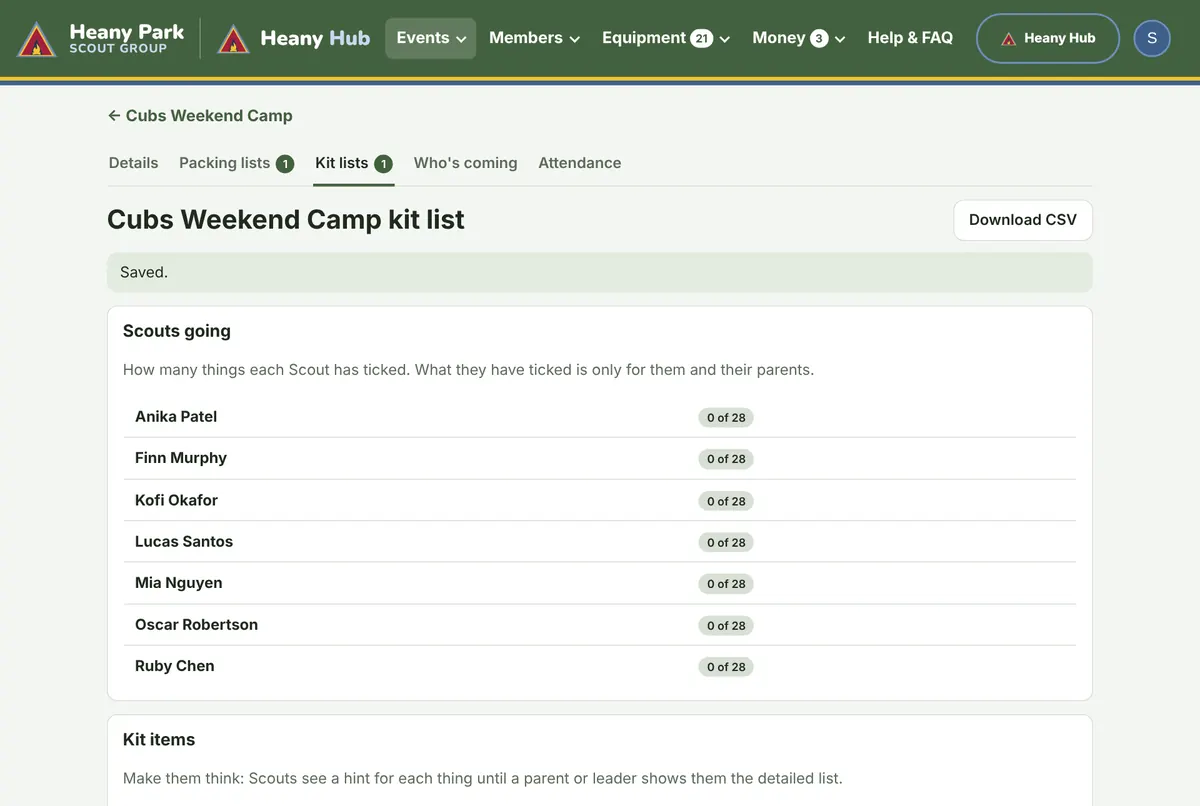
A Scout who is stuck presses I need more detail. Their parents are emailed, and a parent or leader can switch that Scout's list to the detailed wording.
The equipment register
The register lists every piece of group gear, where it lives, what it's worth and when it needs checking. Packable gear belongs to the Quartermaster; the hall and trailers belong to Maintenance.
Finding something
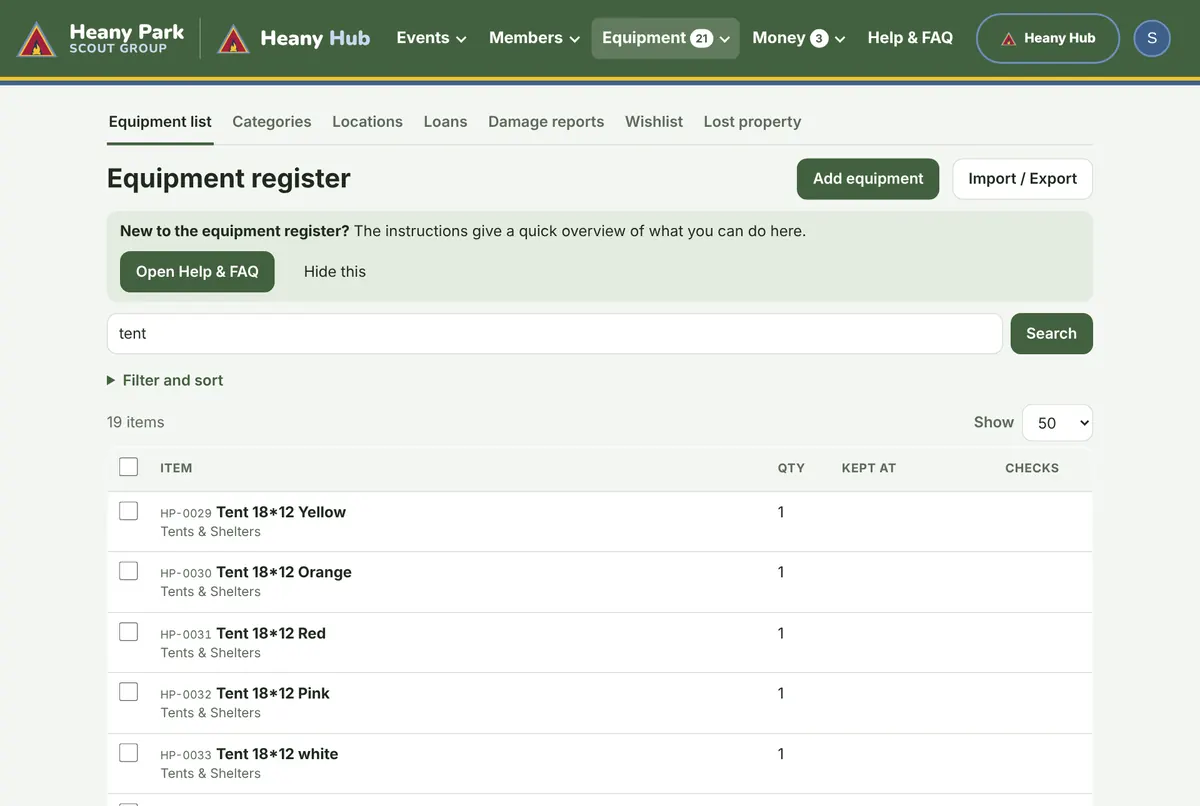
Open Equipment > Equipment list and search by name, asset ID (like HP-0150) or where it is stored. Or scan the QR label on the item with your phone's camera.
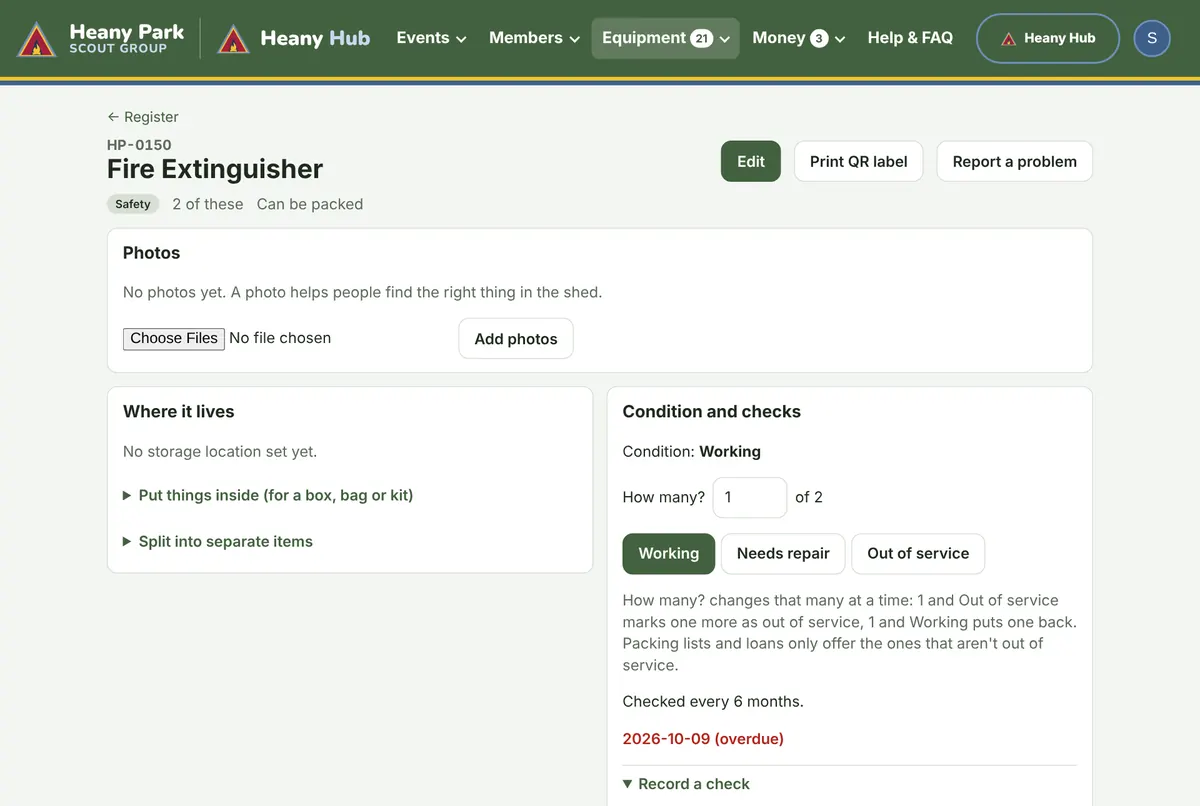
- Condition: press Working, Needs repair or Out of service. For a set (like 6 tents under one ID), set How many first.
- Record a check after checking a fire extinguisher, first aid kit or harness. The next check date is worked out for you.
- Add photos from your phone's camera so helpers know what they're looking for.
Adding new gear
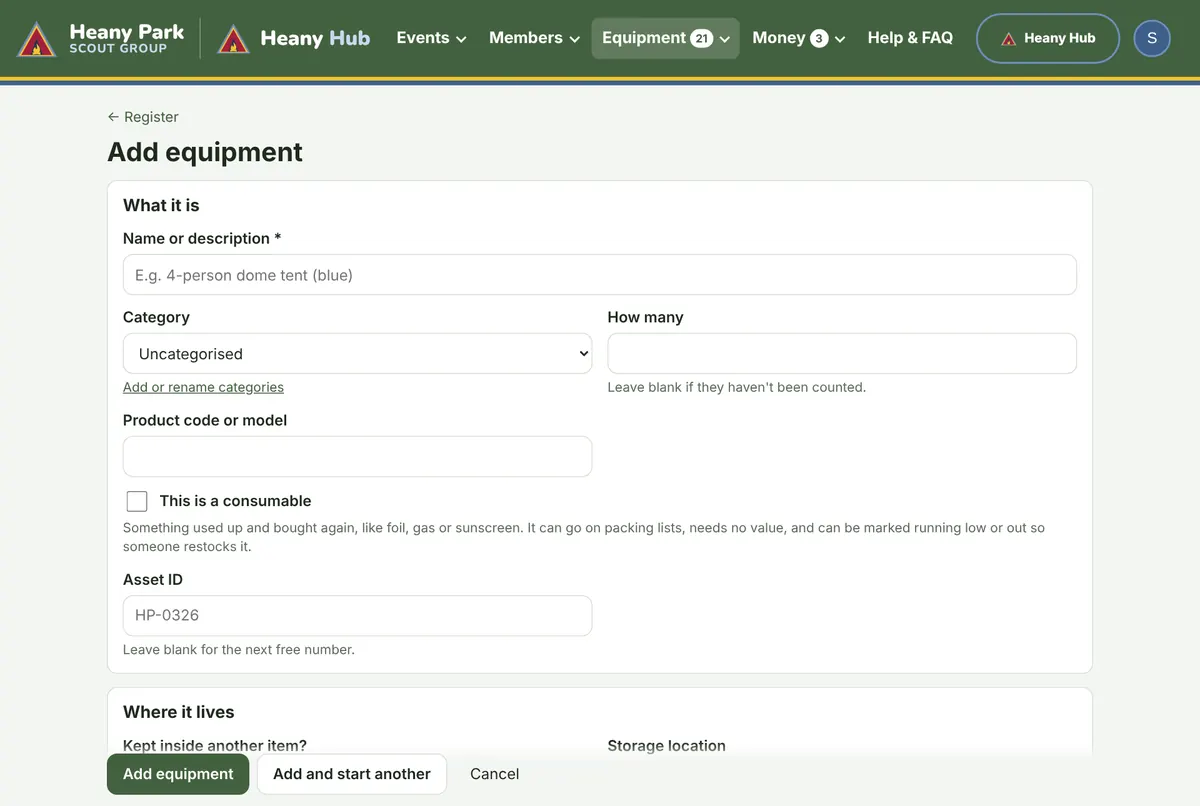
Press Add equipment on the register. Only the name is needed; the next asset ID is filled in for you. Then print its QR label from its page.
Needs attention
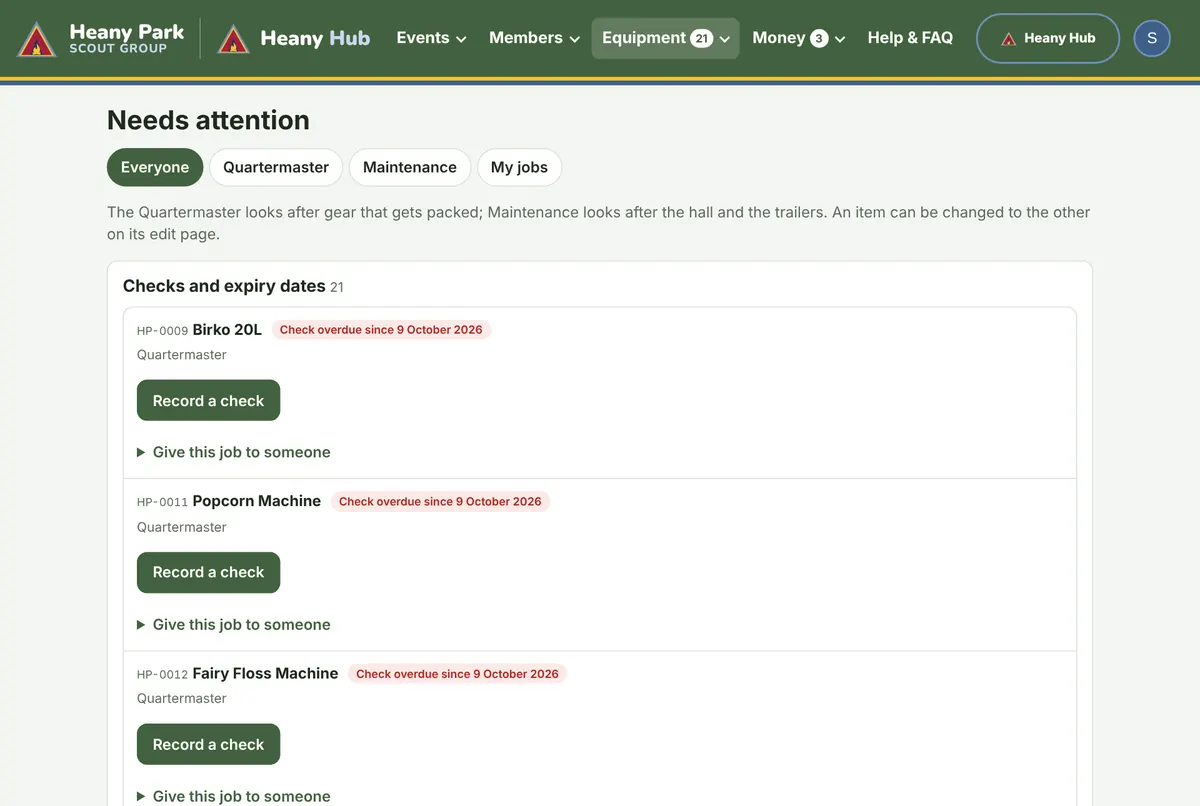
Equipment > Needs attention lists everything to sort out: gear that needs repair, damage reports, checks due, and consumables running low. Use Give this job to someone to hand a job to a person; they get one email listing all their jobs.
Lending gear
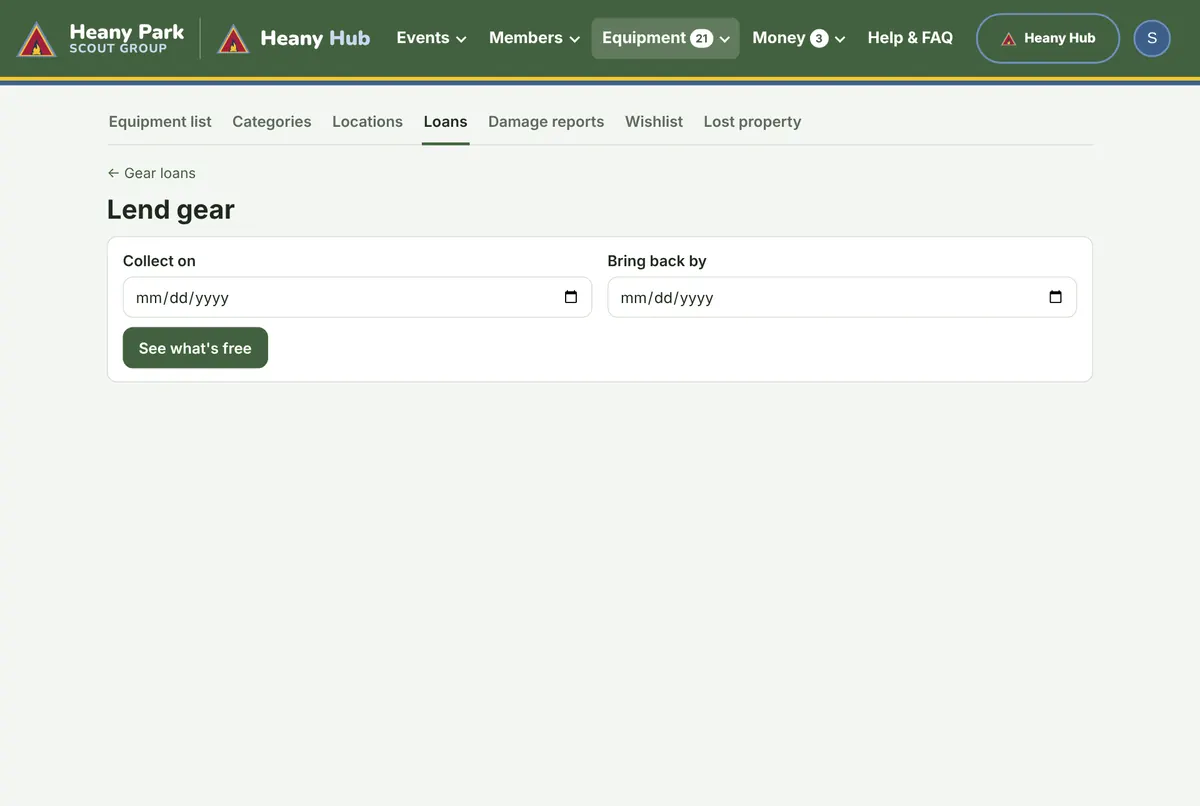
Families ask on the Borrow gear page, and the request comes to Equipment > Loans, where you approve or decline it. To lend something yourself, press Lend gear, choose the dates and press See what's free. When it comes back, press Gear is back and tick anything damaged or missing.
Youth, families and patrols
The Members menu holds everyone in the group. Every leader can look; only the leaders of a child's own section (and the Group Leaders and Registrar) can change them.
Youth
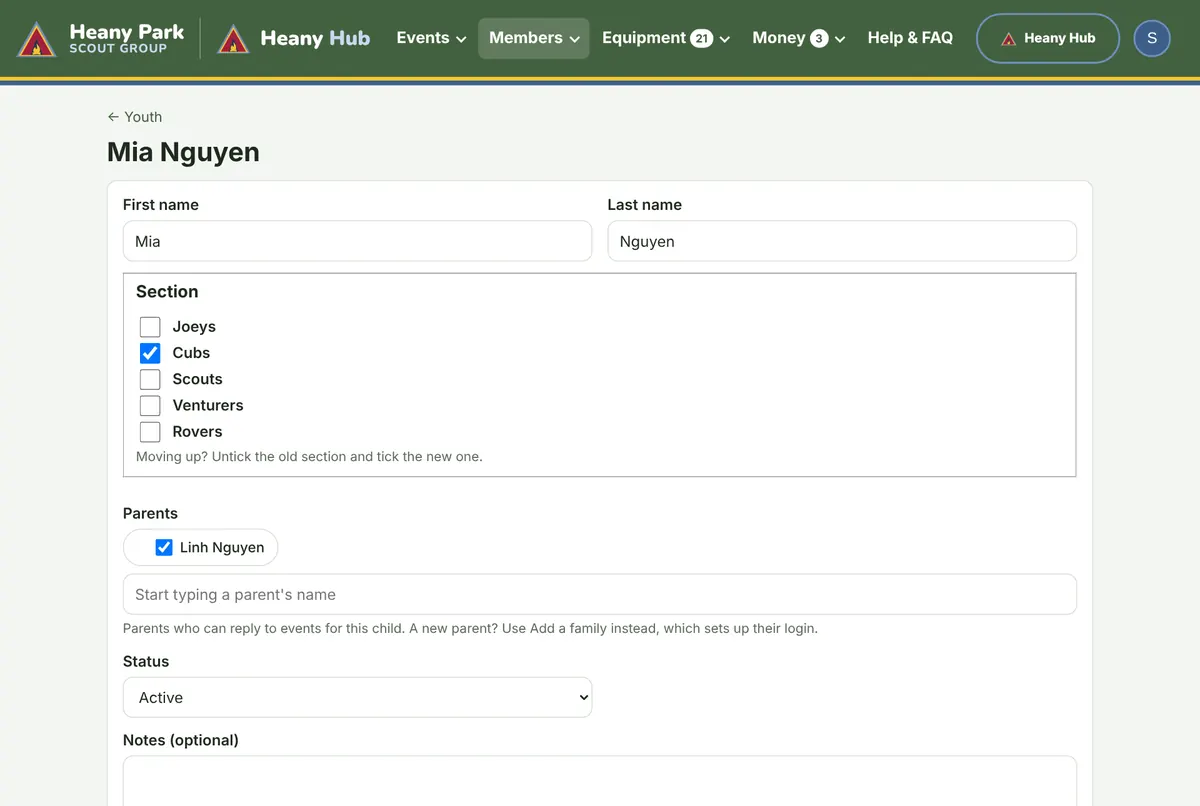
Members > Youth lists every child, with their section, parents and status. Search by name or choose a section. Open a child to change their section (moving up from Cubs to Scouts, for example), their parents or their notes.
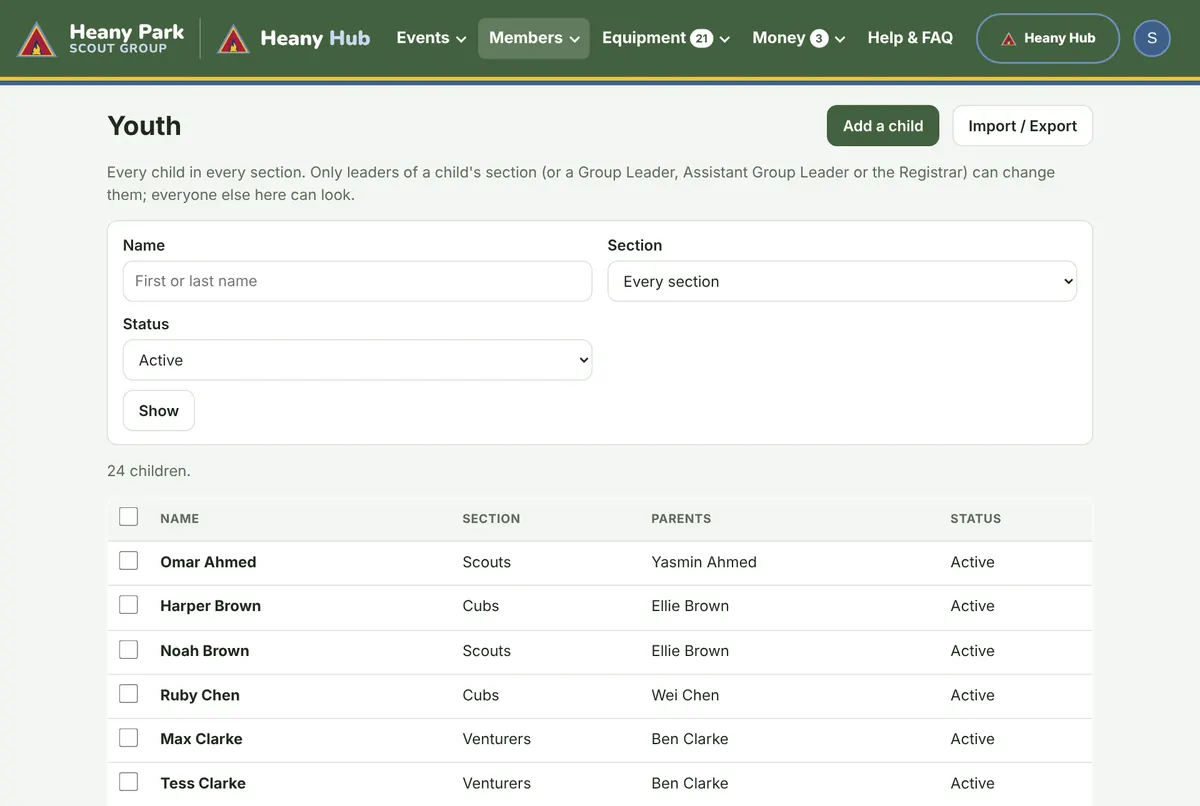
To change several at once, tick them in the list and choose Move to a section or Archive (left the group).
Families
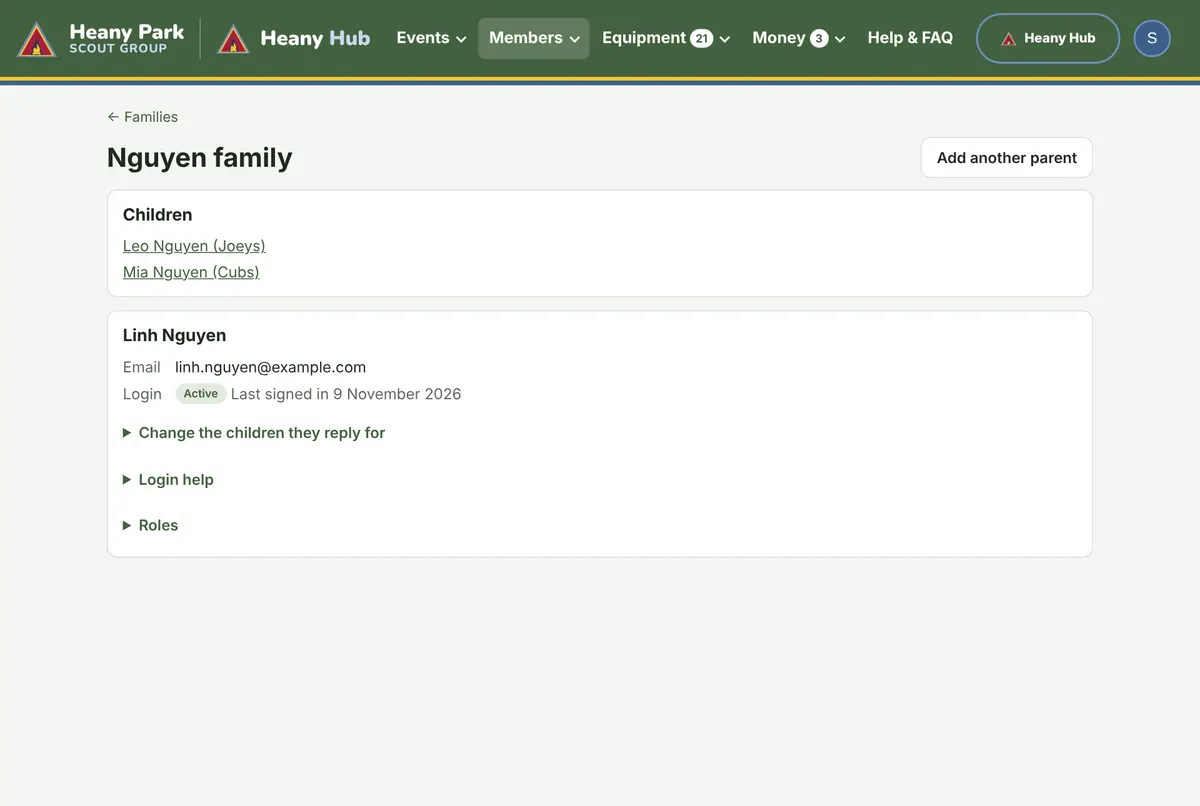
Members > Families shows parents grouped with their children, and whether each parent's login is active or their invite is waiting. Open a family to resend an invite, add another parent, or change which children a parent replies for. Children nobody can reply for lists children whose parents haven't set up their login yet.
Patrols
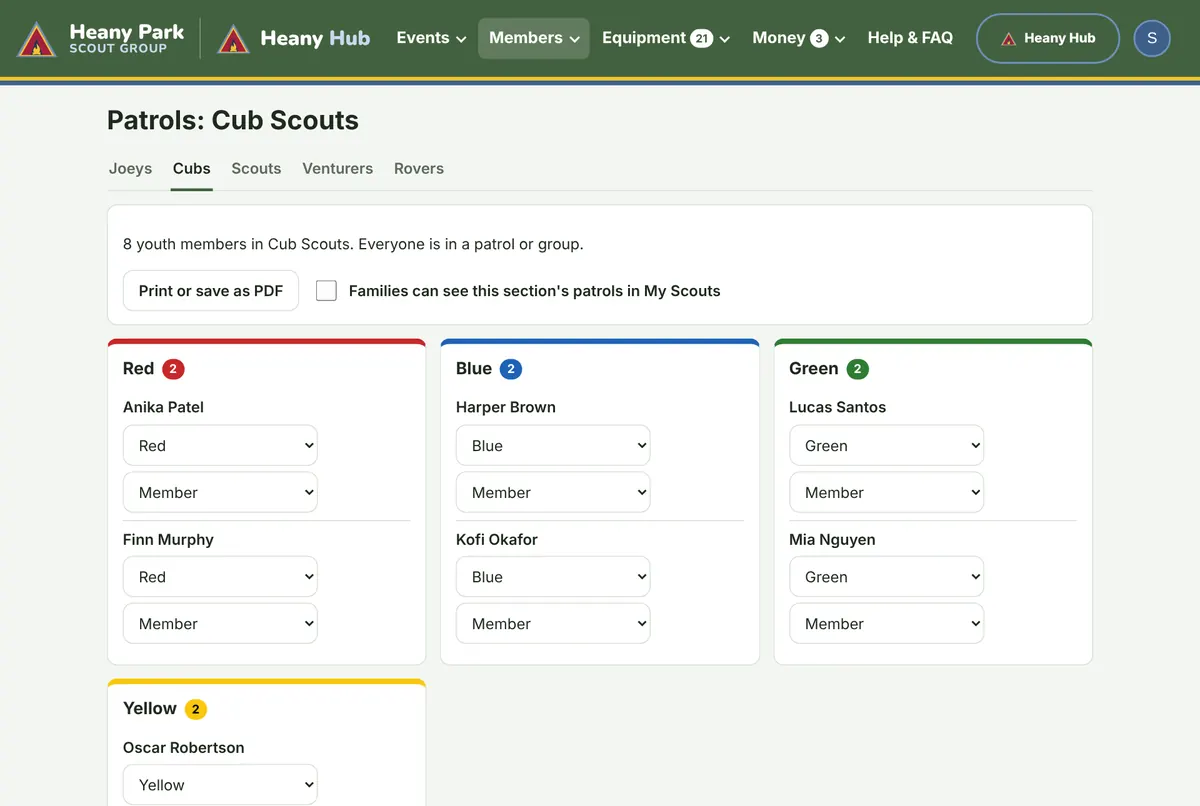
- Open Members > Patrols and choose your section along the top.
- The first time, add patrols under Set up patrols and groups (a patrol called Green is coloured green for you).
- Choose each youth member's patrol beside their name, and make one Patrol Leader and one Assistant Patrol Leader in the second box.
- When you're ready, tick Families can see this section's patrols in My Scouts.
Join enquiries and free trials
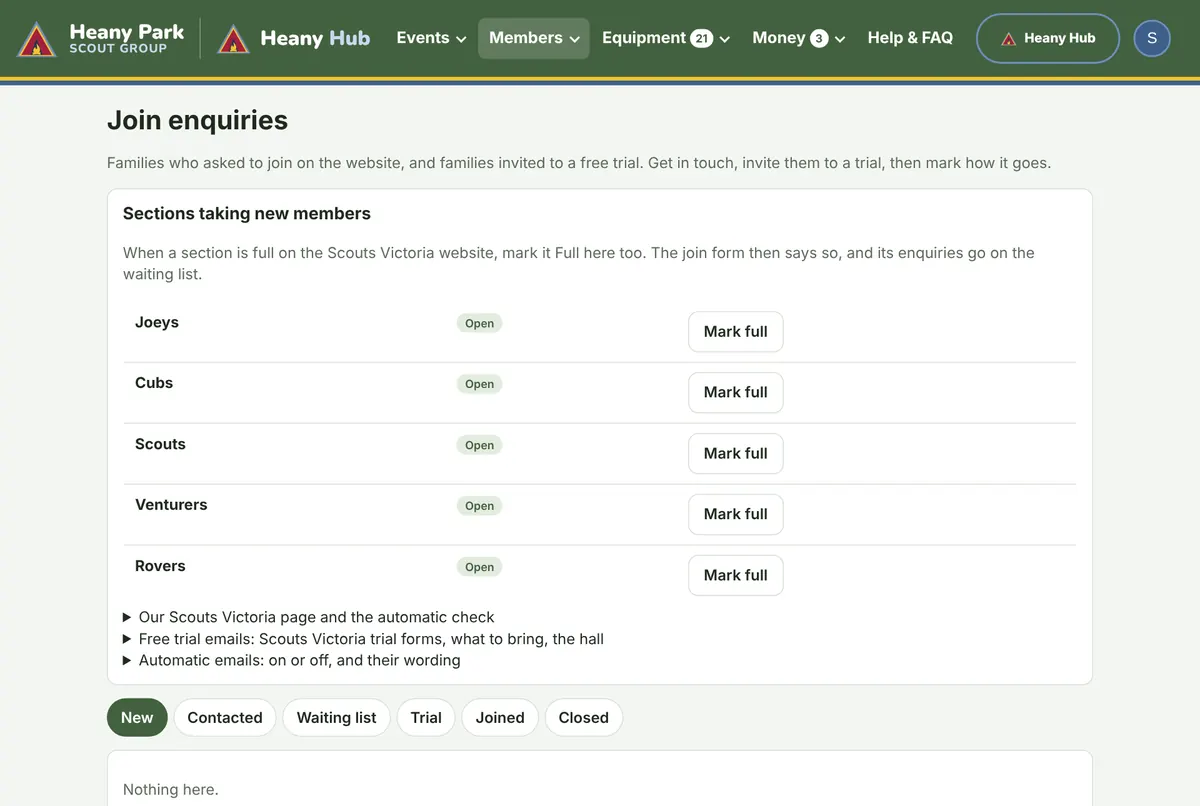
Members > Join enquiries lists families who asked to join on the website. Section leaders see their own section's. Open an enquiry to mark how it's going (Contacted, Waiting list, Trial, Joined or Closed). New families start with three free visits, counted from the roll call; the Trial tab shows who is ready to join. To start a trial yourself, press Add a family (or Invite to a trial on an enquiry); the parent is emailed their login link and their section's Scouts Victoria trial form.
Guests from other groups
A guest is a youth or an adult (a visiting leader, say) from another group or unit who comes to some of our events without joining. Any leader can add one. A guest sees only the events you invite them to by name, and isn't on any section list, fee bill or patrol.
- Open Members > Join enquiries and press Add a guest.
- Choose A youth or An adult, and type their own group or unit.
- For a youth, add their name and section (their age group), then their parent. For an adult, add the adult. If the parent or adult is already on Heany Hub, find them by name so no second login is made.
- Press Add guest and send invite. They get an email to set up their login, and the Group Leaders and Registrar are told.
- Open each event they're coming to, tap Edit, and add them under Invite people by name. Only then does the event show in their My Scouts.
Guests on the Join enquiries page lists everyone who's a guest now. No longer a guest hides every event from them (their login stays). The Registrar or a Group Leader can press Make a member if a youth guest joins us.
Money and refunds
Money > Payments shows what families have paid, to check against the bank. Section leaders see their own sections' events; the Treasurer sees everything.
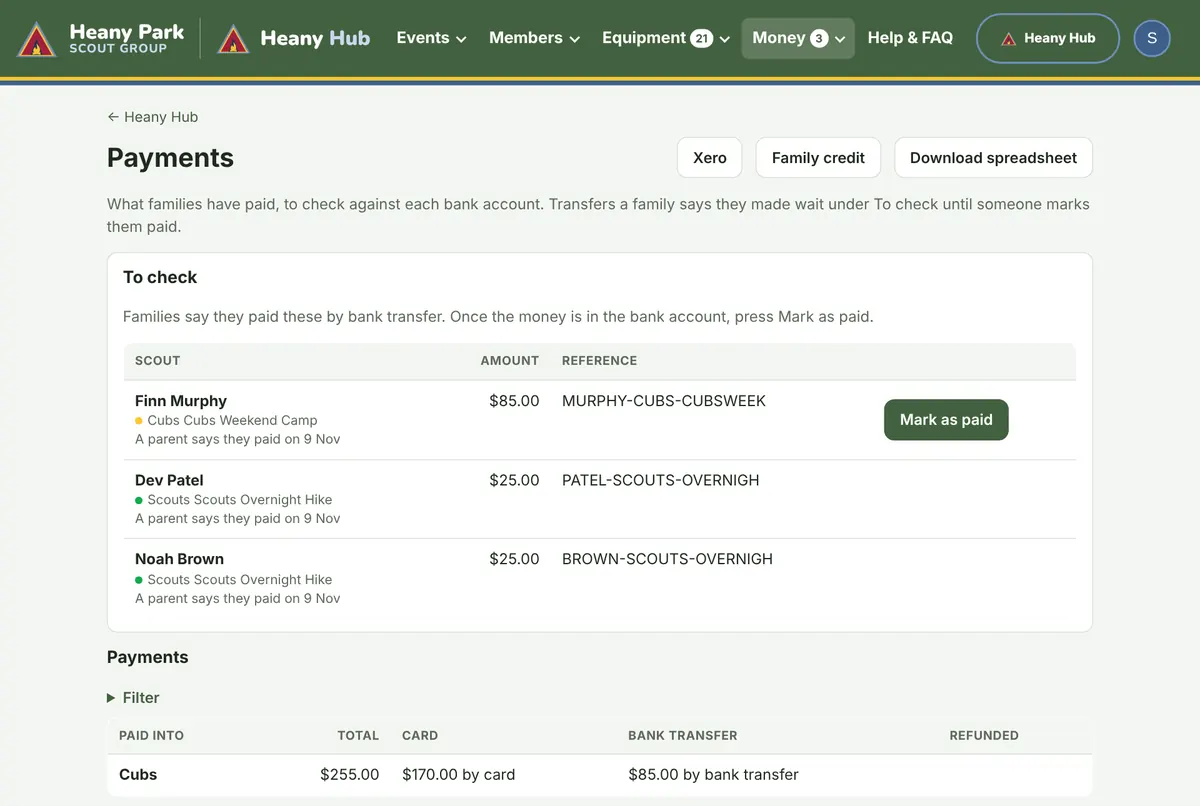
- Check the bank account for the reference shown.
- Press Mark as paid. The number on the Money menu goes down.
Underneath, the totals show how much went into each account, by card and by bank transfer. Download spreadsheet saves what you're looking at for Excel.
Refunds
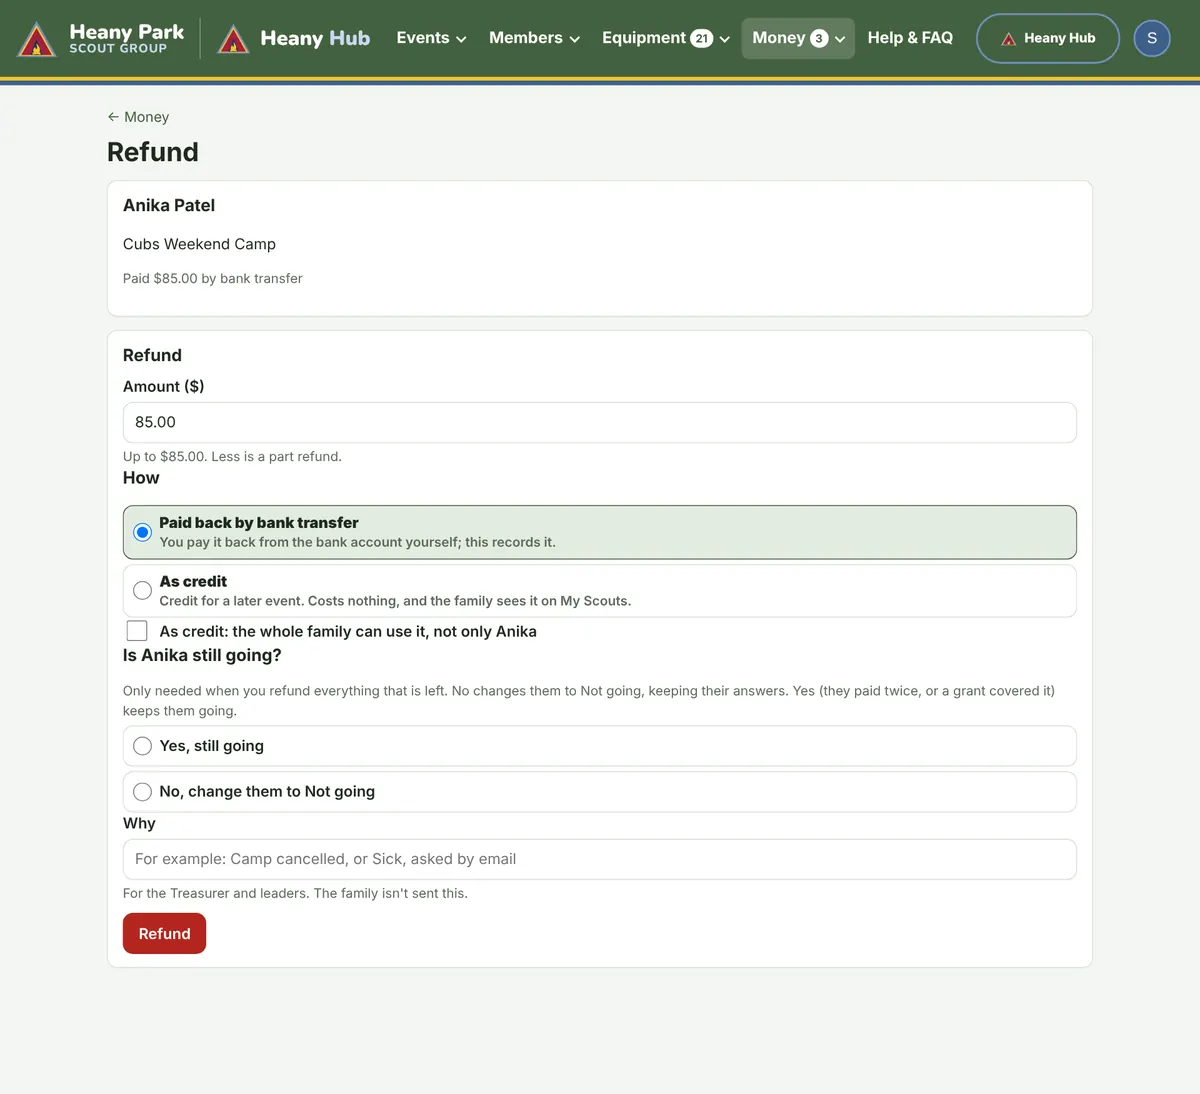
People with the Refunds tick (the Treasurer, Group Leaders and Assistant Group Leaders) see Refund beside a paid payment.
- Press Refund.
- Type how much. Less than all of it is a part refund.
- Choose how: back to card, as credit for a later event (costs nothing), or paid back by bank transfer that you make yourself.
- If you're refunding everything, say whether the child is still going.
- Say why (only leaders see this) and press Refund. The family is emailed that a refund is on its way.
Family credit, at the top of the Money page, shows every family's credit and lets you add or take some off.
Bookings and hire
Bookings
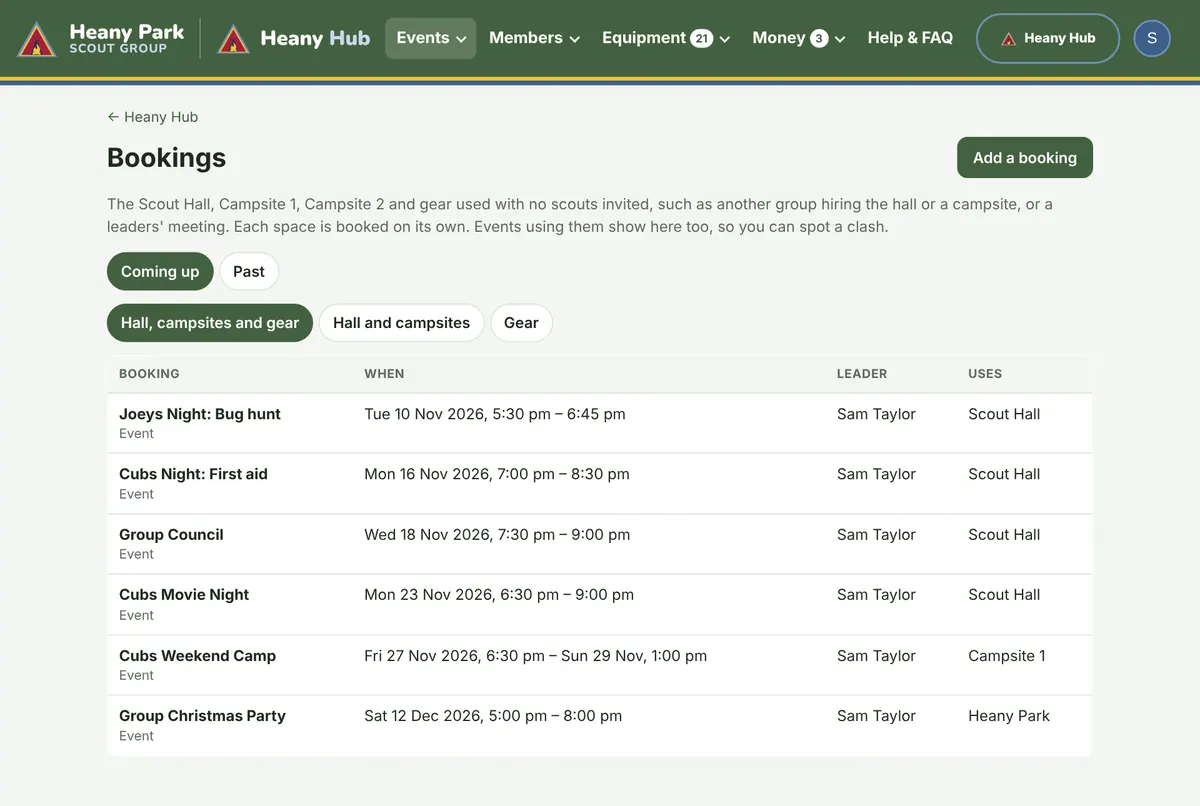
A booking holds the Hall, a campsite or gear when no scouts are invited, such as a leaders' meeting or gear borrowed for training. For anything scouts come to, add an event instead. Events that use the hall or a campsite show on the Bookings list too, so you can spot a clash.
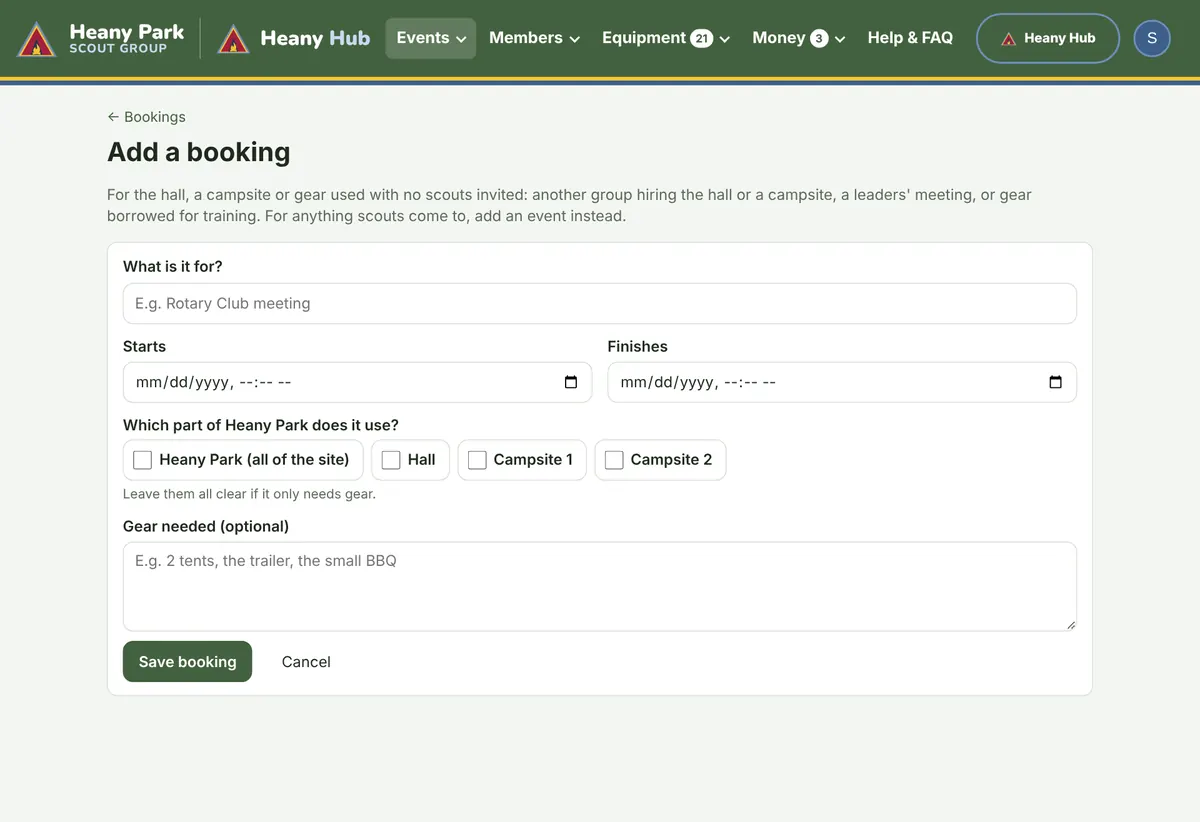
- Open Events > Bookings and press Add a booking.
- Say what it is for, when it starts and finishes, and tick the parts of Heany Park it uses, or list the gear.
- Press Save booking. If something else is already using that space, it tells you first.
Hire
Outside groups ask to hire Heany Park or the Rock Climbing Wall with the form on the website. Requests arrive in Events > Hire for the Hall Bookings Officer and Group Leaders. Open a request to see the price and any clashes, then Approve (which books it and emails the hirer their invoice) or decline it. When the money arrives, mark it paid and the hirer is sent how to get in.